Unit 1: Grade 10 Communications Technology
Welcome to the the grade 10 Communications Technology Course. This course introduces students to communications technology from a media perspective. Students will work in the areas of TV/video and movie production, radio and audio production, print and graphic communications, photography, and interactive new media and animation. Student projects may include computer-based activities such as creating videos, editing photos, working with audio, cartooning, developing animations, and designing web pages. Students will also develop an awareness of environmental and societal issues related to communications technology, and will explore secondary and postsecondary education and training pathways and career opportunities in the various communications technology fields. The quadmester course is about 9 weeks in duration with your final mark made up of a 100% term and no culminating mark.
Course Units and Descriptions
Use this table for an overview and navigate to each of the course unit pages.
| Unit | Description |
|---|---|
| Review course outline for more details | |
| 1 | Careers and Safety- Intro, organization, software, and careers |
| 2 | Vector Production- design, create, and edit illustrations |
| 3 | Raster Production- design, create, and edit photo images |
| 4 | Audio Production- design, create and edit audio files |
| 5 | Animation- design, create, and edit vector animation |
Unit Activity Breakdown Format
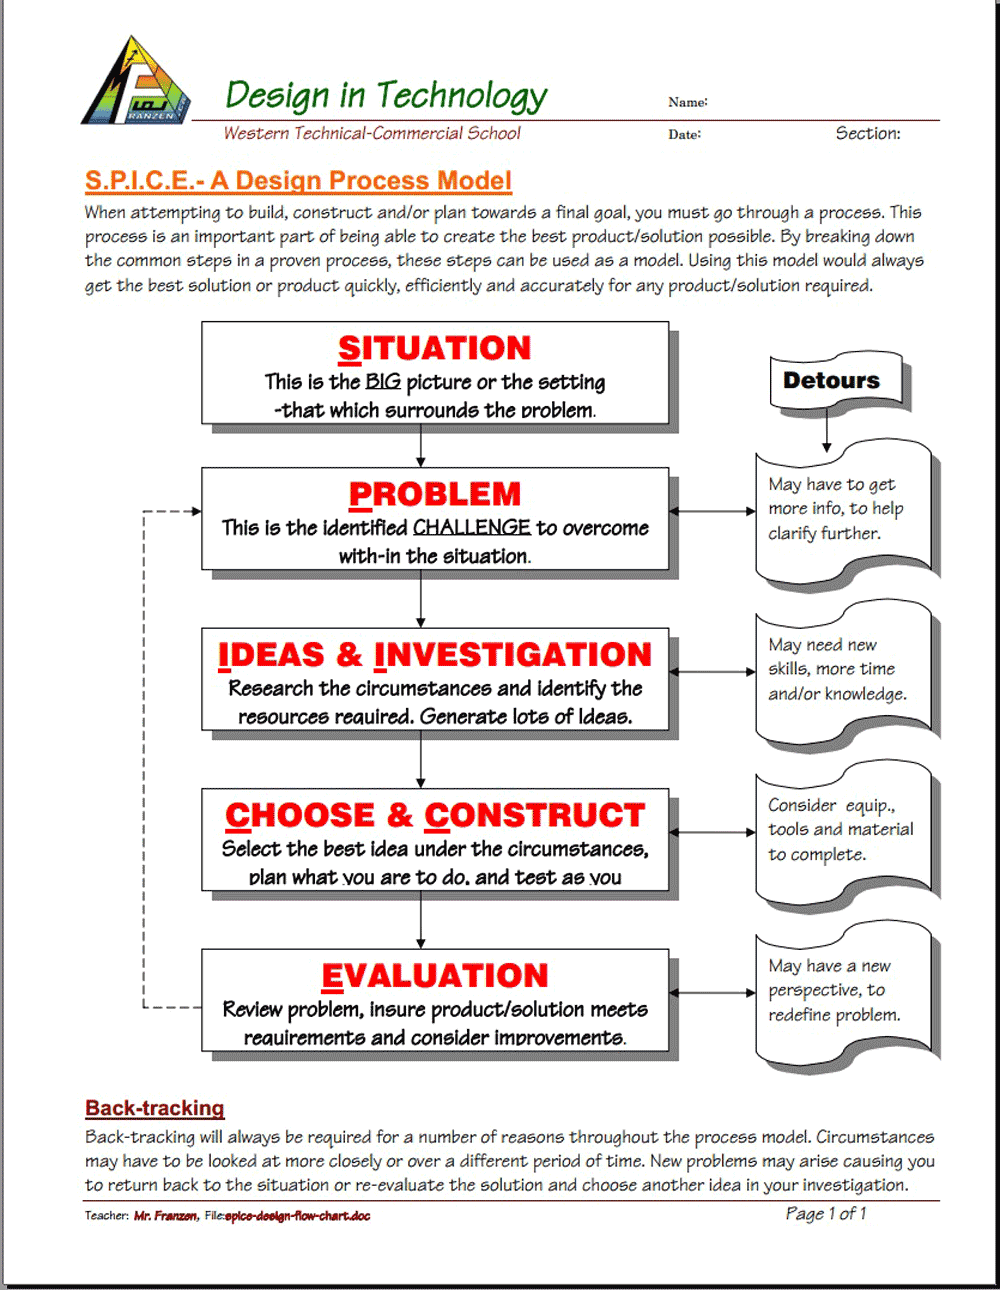
You will notice each unit activity below is broken down into five subtopics using ![]() SPICE, to guide and help you through the project and assignments related to the unit activity:
SPICE, to guide and help you through the project and assignments related to the unit activity:
- Situation - This is the introduction, big picture, or you can think of it as the setting of story/novel
- Problem/Challenge - What must be resolved or completed, i.e. what you will need to accomplish
- Investigation/Ideas - includes gathering ideas, research and organizing information to help create, construct, and/or complete the Problem/Challenge
- Create/Construct - take your best idea and complete and/or build the needed solution
- Evaluation - did the Problem/Challenge above get resolved and/or completed
In this unit, students will be introduced to the course, look at safety, organization, software, journals, and research and learn about several related careers

Unit Content Activity Quick Links, Click to Jump to Specific Activity!
- Unit 1, Act. 1: Introduction, Computers, Organization, and General Safety
- Intro,Tech Info, Routines-info, Remote Learning, Safety, Software, Shortcuts, Journals - mini assignment - missed day, Evaluation
- Unit 1, Act. 2: Related Career
 Unit 1, Act. 1: Introduction, Organization, and Safety
Situation:
Students are starting a new course in Computer Technology and will be introduced to the course, given some organization and support documents, and safety awareness.
Problem/Challenge:
Getting familiar with what the course is all about, related careers, class routines, expectations of the course and the teacher, general administration of class, and safety are all important issues to know and understand. This activity will allow students the opportunity to organize and prepare for course and understand administration, evaluation, marks, routine, possible career direction, and expectations for classes to run smoothly.
Investigation/Ideas:
The following is list of items that are to be reviewed by students to understand what is going on in this course:

- Course Details
- General Safety
- Detailed Safety Issues
- Shop/room Layout
- Shop/room Resources
- Emergency Procedures
- Expectations
- Assessment & Evaluation
- Class Policies
- Routines
- Remote e-Learning
- Attendance and Lates
- Moodle Log-in
It is important that students feel comfortable with the above points and should know what is happening in the course.
Create/Construct:

Introduction
Start by organizing your supplies and materials for taking and storing your notes and assignments in a binder. A duo-tang will be provided for your in-class journals and safety related paper work and stored in the classroom filing cabinet share. Review the course outline and class routines and write down any questions you have about the course, requirements, expectations, or responsibilities you need to be clear on. Timetable and school policies will also be reviewed using your agenda as a guide. A room and school tour will be conducted to familiarize students with our facilities.
A ![]() Survey - Getting to know you will be handed out for students to fill out in-class so that the instructor can get to know you and allow you to write down any important information that you feel the instructor should know about such as extra support, health, social, and/or interests you may want to pass on..
Survey - Getting to know you will be handed out for students to fill out in-class so that the instructor can get to know you and allow you to write down any important information that you feel the instructor should know about such as extra support, health, social, and/or interests you may want to pass on..

The following is a list of related support document links for students, which will be reviewed in class:
 Communications Technology - Course Outline
- Course Achievement Breakdown
- Learning skills work habits
- Evaluation and Tips Breakdown
- Foreperson Responsibilities
- Peer Evaluation Process
Tech Info Page
One of the first things in class we do is review the ![]() Introduction to Technical Classes, point number three above which gives you a great overview of the course operation. The top section of the page has ten blank boxes to be filled in with the important things we will cover in this course. You will find this information by reviewing the course outline and listening to the teacher discussing what is happening in the course. The bottom section will also need to be filled out with two in-class peer partners for contact information and support with-in the class to help foster team support. collaboration, and responsibility.
Introduction to Technical Classes, point number three above which gives you a great overview of the course operation. The top section of the page has ten blank boxes to be filled in with the important things we will cover in this course. You will find this information by reviewing the course outline and listening to the teacher discussing what is happening in the course. The bottom section will also need to be filled out with two in-class peer partners for contact information and support with-in the class to help foster team support. collaboration, and responsibility.
Important Information, Routine Details, and Support
To help everyone understand daily routines, expectations, student responsibilities there are some steps that you must be aware of, that we will discuss in detail such as:

Paper Hand-in Bin
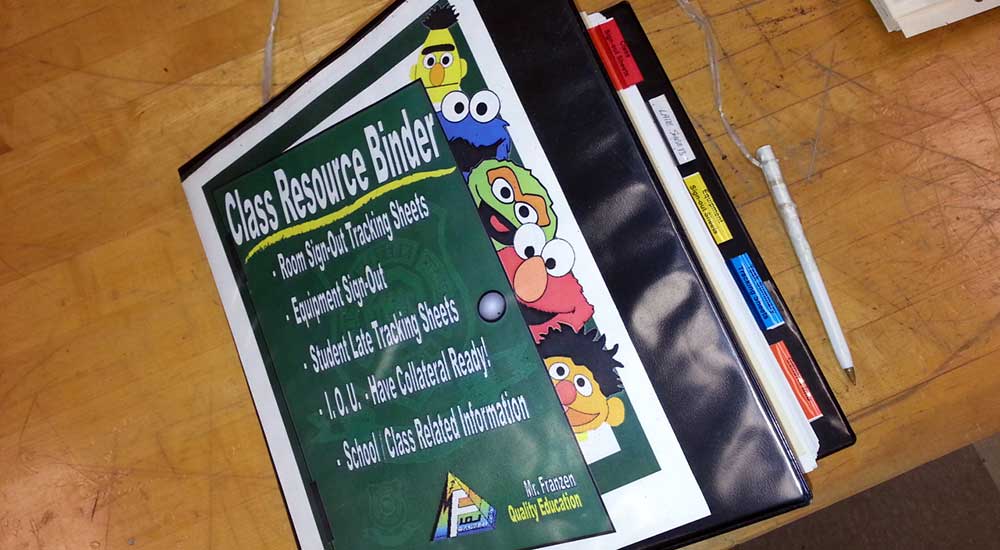
Resource Binder
Current Events
- Class schedule day
- School/room map layout (tour)
- Late arrival process and class entry
- Absent - note name, reason, & dates to office VP
- Pre-project preparation
- End of period journals
- Paperwork hand-in bin
- Paperwork over-flow out bin
- Class share resource table/area
- Extra handouts & digital copies
- Daily current events board
- Supply teacher respect and learning
- Due date - beginning of class
- Leaving the room - process (ex. - washroom - 1)
- Class Sign-out resource binder
- Seating - support, proximity, and behavior
- Partners, groups, and leaders - collaboration
- Late/missed class lesson/work responsibilities
- Clean up process - yours and others
- Back-up digital work daily
- Contact process - e-mail
- Extra support/help options
- Don't know, or not sure? ... ask!
Remote/Virtual e-Learning
Remote learning is something relatively new for High School students given our Covid Pandemic and the following points should be considered.
- Make a schedule and keep a routine to help with even breakdown and consistency of learning - requires self-motivation and being self-sufficient
- Create a study area and stay organized, use a distraction free environment, in an open public area, so you can focus on learning
- Require appropriate technology - microphone, web cam, good Internet connection, lighting, ergonomic comfort
- Communication- hand-up, chat, normally muted, clarifications & understanding of content
- Read assignments and course material, post in discussion forums (chats), work ahead, participate, and seek help if/when needed
More information to support this course can be found on the Virtual e-Learning Support page and is a must to check out. This page can also be accessed from any page by going to the main menu, selecting the Support drop-down, then Virtual e-Learning.

Safety
In this activity, we will review the ![]() General Safety Presentation to get an overview of safety concerns students must be aware of in the school and classroom. Students will review and sign a
General Safety Presentation to get an overview of safety concerns students must be aware of in the school and classroom. Students will review and sign a ![]() General Safety Contract then take home to parents to also review and sign. Safety awareness and lessons in this class will be on-going throughout the course, and specific to each project so that it is fresh in your minds when starting work on that specific project. Although there are less physical dangers, there are other safety concerns such as working with digital work safely as an example.
General Safety Contract then take home to parents to also review and sign. Safety awareness and lessons in this class will be on-going throughout the course, and specific to each project so that it is fresh in your minds when starting work on that specific project. Although there are less physical dangers, there are other safety concerns such as working with digital work safely as an example.
Given our current situation with Covid-19, a presentation on ![]() Covid-19 Safety and Well Being will be also reviewed, for process, support, and clarification.
Covid-19 Safety and Well Being will be also reviewed, for process, support, and clarification.
Software Applications
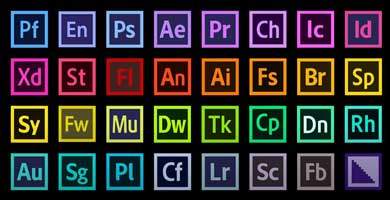
There are several options you can look at for software, if you can not access, install, or run course related software. The course will be using the industry standard, Adobe Suite for the graphic and multimedia projects which you will have access to at the school. If you are working from home and can't use this suite for one reason or another, speak to your teacher before looking at other options. There are older versions of Adobe suite CS4, 5, and 6 that came out before the current cloud version came out, which if you have, will work fine also. The following are some other prioritized options/suggestions that you could look at, if you have issues with cost, compatibility, and computer power requirement issues.
- Office related: Microsoft Office, also try Google G Suite, Libre Office, Free Office
- Vector-Illustration: Adobe Illustrator, also try InkScape, Vectr.com, Gravit, Affinity Design
- Raster-images: Adobe Photoshop, also try Gimp, Paint.net, Photopea, Krita, Affinity Photo, Pixlr
- Music-sound: Adobe Audition, also try Audacity
- Multimedia video: Adobe Premiere, also try DaVinci Resolve, OpenShot, Blender
- Motion Graphics-Animation: Adobe After Effects/Animate, also try Natron, Blackmagic Fusion16/Wick Editor
- Web Authorware: Adobe Dreamweaver, also try KompoZer, BlueGriffon
Remember though, that all software applications may get similar results, how they do this, what tools they use, and operation/process they use will most likely be a little different than their alternative counter parts and include some trade offs you may need to consider.
USB Memory, File Naming Conventions, Folders, Back-up, and Shortcuts

It is highly recommended that you get a USB memory stick, for saving your work on to. It does not have to be large, 2 Gig or larger (use your school drive temporarily if you do not have your USB flash drive). You will need to follow instructions on the Tech Info handout (PDF page printed and handed out recently, that can be found above) to create shortcuts inside a main folder named with your course code, and a sub-folder named "shortcuts". With an organized folder structure, you now have a place to save work to. You are to create the shortcuts below in your shortcuts sub-folder.
- School Pick-up folder (pick-up)
- School Drop-off folder (drop-off)
- Course Google Classwork (TIJ-GCW)
- Your Daily Journal Sheet (TIJ-My-Jou)
- Your asynchronous Attendance form (TIJ-Att)
- Your course folder root directory (TIJ)
- Your back-up folder at School (TIJ-BKS)
- Your back-up folder at Home (TIJ-BKH)
- Franzen website Home Page (mfranzen)
- Franzen website Course Details Page (TIJ-Det)
- Franzen website Course Journal Page (TIJ-C-Jou)
- Franzen website Course Marks Page (TIJ-Mrk)
With all your shortcuts created and saved to your USB sub-folder-shortcuts, you can also copy these shortcuts to your desktop, so you can use them from multiple locations, but the desktop is not a safe place to save work to, as it could be deleted at any point in time.
To keep your electronic work for this course organized, you will need to create more folders for future projects as you continue with the course. The intent is to work off of your USB in school and save to your local or cloud drive when you are finished at the end of class either at home or at school, as a daily habitual back-up process. This way you can take your work with you and work elsewhere if needed and it is faster to access a flash drive then the board network or a cloud drive.
In school we also make use of and use the internal network for getting work and handing in work. These locations are found clicking on the Western Tech shortcut on your desktop on your school computer, then navigating to either selecting the "Pick-up" folder, for getting work from teacher or the "Drop-off" folder, for handing in work.
File Naming Conventions and Shortcut Demonstration
To finish you will need to use all three shortcut links in an exercise called "shortcut-files-folders" and copy and paste the correct shortcut addresses to demonstrate you have done this correctly.

- Using your newly created shortcuts, go to the pick-up folder and get a file called "shortcut-files-folders" (for Virtual students go to the related topic in Google Classwork )
- Save the text file to your shortcuts folder (this is a good time to review file naming conventions in the Tech Info Handout again and save it right away with the correct file name, and then open it up
- Type your header information which you are required to have, on all assignments when handing in,being aware that it is always in the top right of the page with you name having your just your last initial, first name name
- Several shortcut target addresses will be needed from your recently created shortcuts by right clicking on shortcut to get to the properties, then copy the shortcut link address to paste into your project text file just underneath the related shortcut name/description
- You are also required to get the location of the specified shortcut in the required folder locations you are keeping your files in. You can get the address location for the shortcut by right clicking on your web site shortcut link, click on properties, then the switch to the General tab to copy the location where you saved this shortcut link to, then add the actual shortcut file name and correct file extension (more here on File extensions). For Google drive, use the worded file location, not the link.
- Do the same steps as in previous for the other required locations and shortcuts
- Go to the Tech info page on the site and open up the PDF file and copy the section called "Organizing and saving your work" that explains about file naming conventions and paste below
- Check over your shortcuts assignment and ensure you have checked that your file naming convention is correct for this file.
- Convert your text file to a PDF by either printing to a PDF or using an online converter and hand-in, by dragging your file to one of your drop-off folder shortcuts, created earlier, which will send it to the school class/course drop-off folder.
Ensure your work is saved first on your USB, then drag and drop onto the Drop-off folder shortcut. As you don't have access to this folder, drag and drop one more time and you should get a message saying the file is already there... confirming you were successful in copying the file over to Drop-off the previous time. Note: trying to save your work directly to this Drop-off folder will result in your file not being saved and not handed in as students do not have editing privileges inside the Drop-off folder.

Journals
Part of the curriculum requirements is to keep a log of your learning and report on it, which can be done in different ways. Rather than focus on tests, quizzes, and essays, a daily digital journal is a great way to plan, track, and recognize one's learning. Here are some great details:
- Providing a constant and consistent way to measure/see your learning, growth, and progress throughout the course
- Consciously track what, how, and when you learn in the course which allows you to recognize, focus on, and take more responsibility and ownership with your learning
- Control/decide what you want to focus on forming your own self-reflection, learning, and assessment pathway
- It also helps you plan and organize your daily activities and work load
- You can plan homework ahead of time, keeping you engaged with current topics, assignments, and keep up-to-date
- Show/communicate to your teacher that you are planning and organizing course work, working with partners, what you learning, and your efforts and accomplishments, all the while getting marks for it.
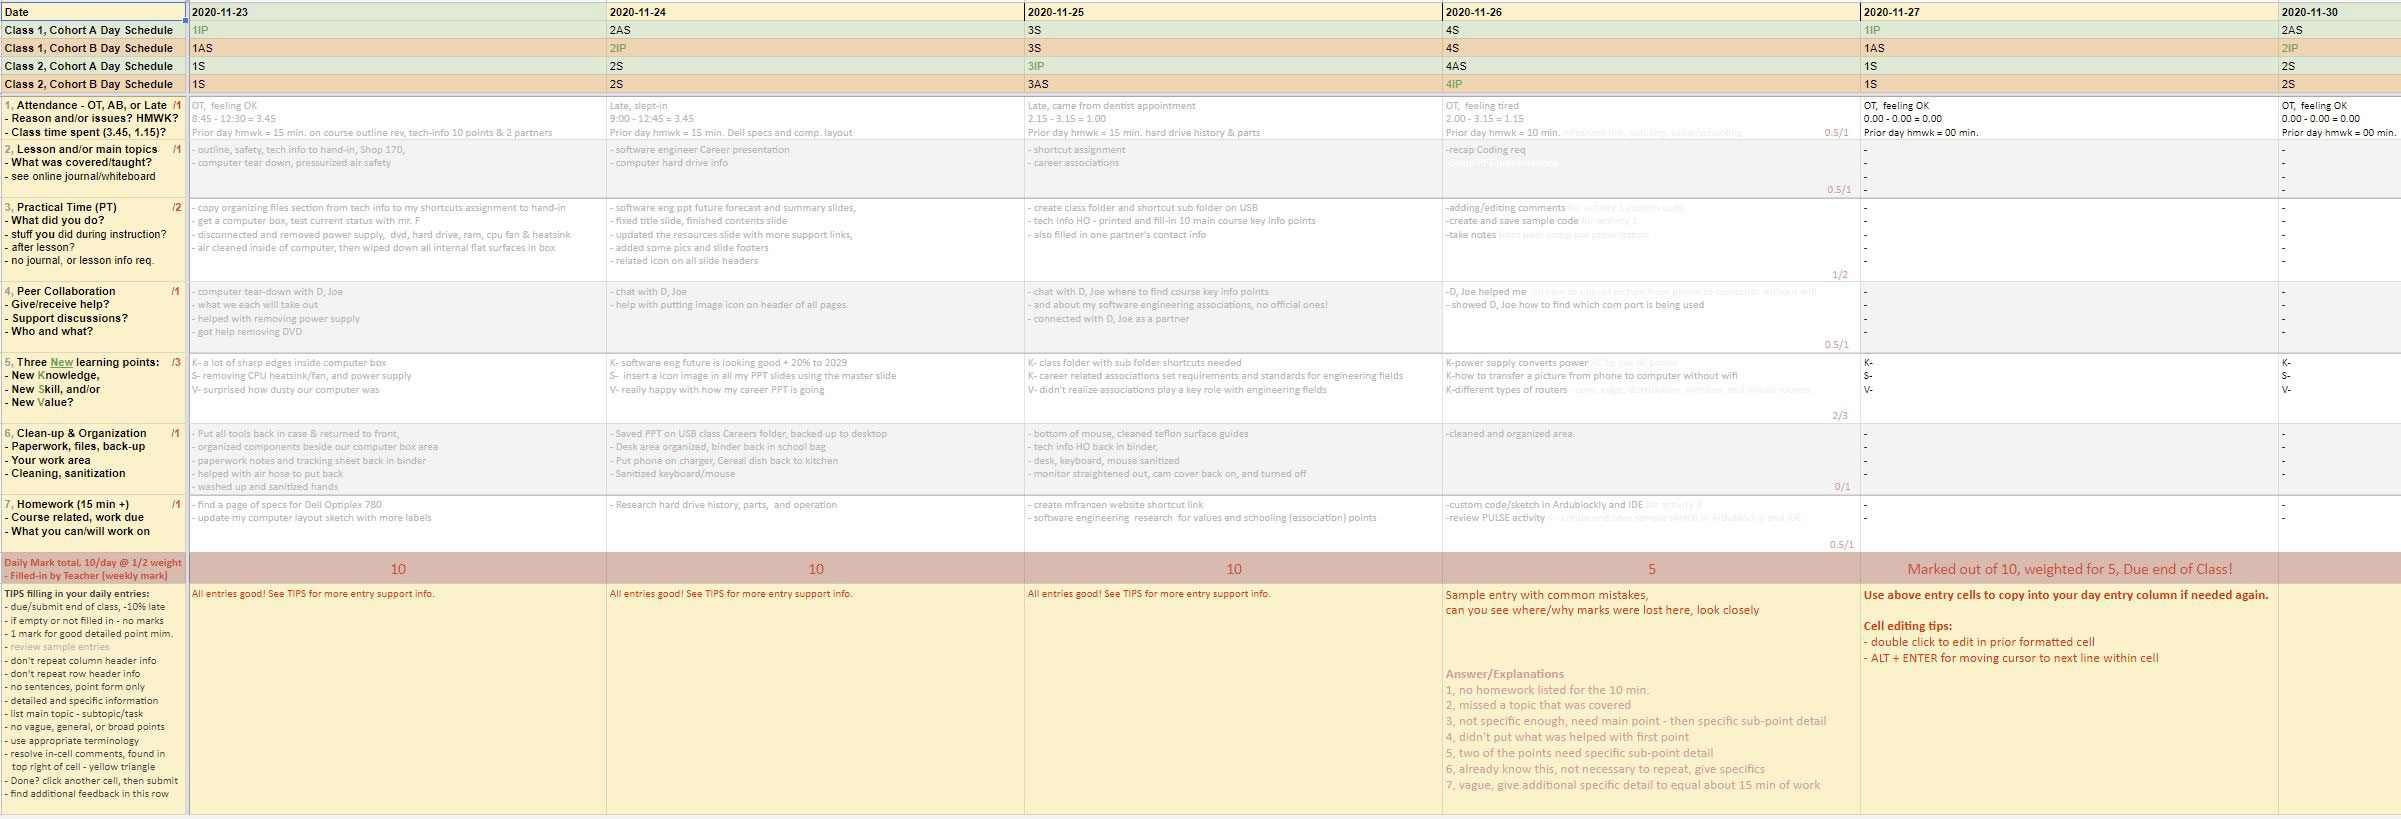
Journal Entry Process
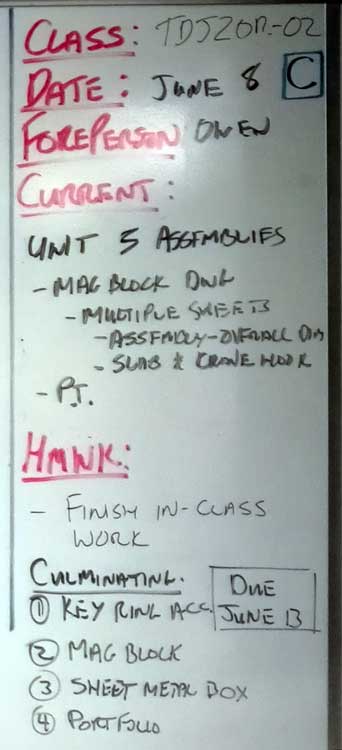
Each day at the beginning of class while instructor is doing a review of last days work and an overview of the current day, you can already start entering-in, information about the current days activities. This can be obtained by either listening to the instructor, copy from the white-board, and/or use the website online journal, to fill in the start of your journal.
Throughout the class or closer to the end of class, enter what you actually did, your peer collaboration, and your new learning as it is recognized. Your information must be in point form, be specific, and have detailed information. Anything vague, broad, or general will not get full marks.
At the end of the class (usually the last 10 minutes), you can complete the journal by filling in the clean-up/organization, and homework sections. *** Discuss with partner about your entry details and see if there is any refinement needed.*** Remember to only put about 15 minutes of homework which could include, things such as: what was done in class and needs to be finished or continued to work on, an assignment coming due, and/or reviewing the next part of the project or assignment. Remember to be specific with your details, so it is easy to see the 15 minutes of actual work intended. When making entries, give it some thought before putting your detailed specific points down, so that they are informative using appropriate technical terms, in-order to get full marks.
Before you leave class, submit your journal for review and marks. After normal class time, the journal will be considered late and my not be marked until next block marking time. If you have submitted your journal and it has not been returned, you can pull it back by un-submitting, to make current day's entry, so you don't get another late mark.
It's All in the Details

Some examples of vague or broad points:
- Start XYZ presentation
- Research XYZ topic
- Finish XYZ assignment
- Review XYZ information
- Continue XYZ handout
- Work on XYZ project

Some good examples of specific details:
- XYZ PPT, slides 1-3
- Research XYZ topic, sub-topic 1 & 2
- XYZ assignment-step 5
- Read XYZ info, section 1
- XYZ questions 5-9
- XYZ project, part A
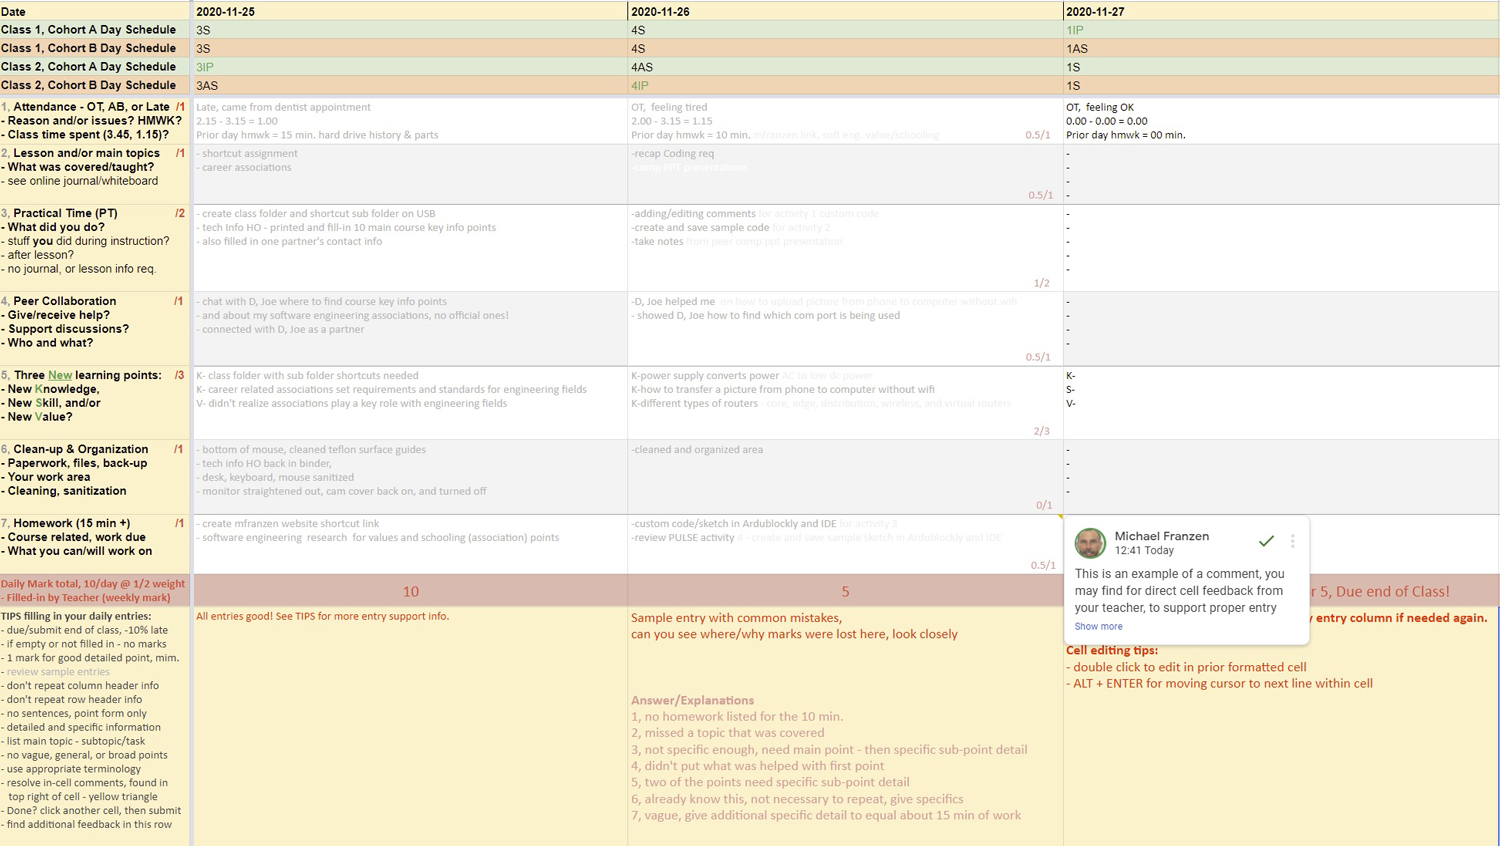
Cell/Box Details
- Attendance/hmwk: time you showed up: OT = on-time or AB = Absent, late with quick reason, how you feeling today, on the next line start and finish of class, total time in hours.minutes, then on third line how long you actually spent on homework and accomplished
- Lesson/topics: what was covered, main topics - use white-board and/or class journal and put into main points
- PT: (practical time) what did you accomplish/do with free class work time today, remember be specific with points
- Peer Collaboration: either helping or getting help, having a discussion/chat - who and what, be specific with points
- NEW Learning: fill in new learning (pick your most significant points in the form of
- KNOWLEDGE - new information you have learned such as new terminology, a new process, or information that you did not know
- SKILL practical work done such as computer file naming/saving process, cutting cardboard correctly, using a tool or machine properly, etc
- VALUE is a new opinion formed or feeling based on your experience with new knowledge and/or skill that you have completed
- Clean-up/Organization: Cleaning, sanitizing, organizing your working space, learning equipment, learning tools, hard and soft resources, putting things back, planing future work, saving and backup, and preparation for next work period are some general things to look at, but again, be specific with details
- Hmwk: what assignment is coming due, 15 min of specific detailed work, possible future work to review
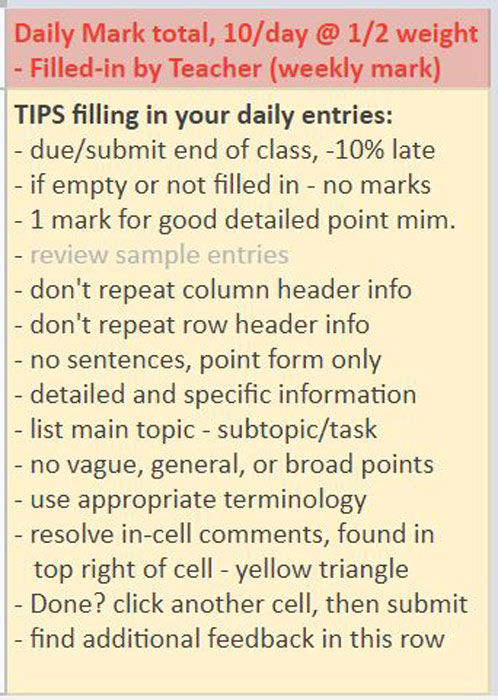
Comments and Feedback
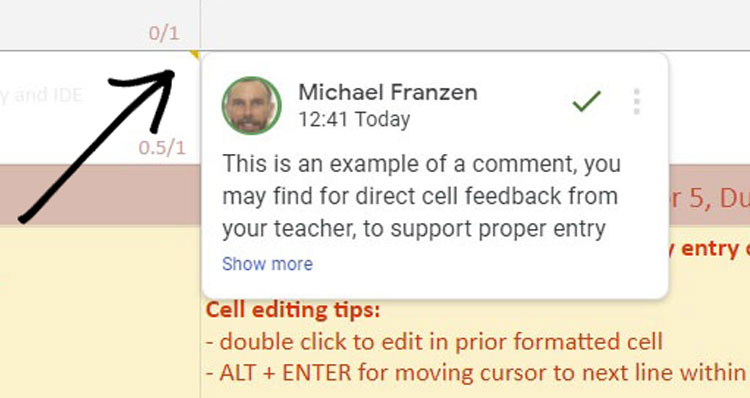
You may find teacher comments directly in journal entry cells or in Tips row. Comments directly in the cell is represented by a small yellow triangle ![]() found in the top right corner of cell, which you can hover mouse over to access/see. Ensure cell comments are either resolved or replied to.
found in the top right corner of cell, which you can hover mouse over to access/see. Ensure cell comments are either resolved or replied to.
To resolve (acknowledge), click on the green check mark at the top of the comment box, and this means you have read and understood the comment, usually explaining what was done wrong and/or how to improve your mark in the future.
With the Tips row comment section, just below your assigned mark by the teacher, these comments will be more generic critiquing on the whole entry for that day.
Mini Journal Comment Assignment, (Before You Start Your Journals):
Create and enter a comment similarly shown in picture above into a cell located down the fist Day 4 column of sample entries, in the Homework #7 cell.
Below, read and add the following two sentences and 4 points (white section) into the comment created by you, then follow the instructions on the three points in the comment, to earn the 12 marks:
This is an example of a comment, you may find for direct cell feedback from your teacher, to support proper entry input. Once read, do one of two things. Usually you will click the green check mark to show you have read and understand or if further information is needed, select the reply to respond. For this mini-assignment,
- Delete/remove the extra cohort-day schedule bar(s) that is not your cohort, check timetable or ask, if you are not sure which is yours. (4 marks)
- Read, review, and copy the "Answer/Explanations" (for common mistakes made on journal entries) from cell in column 4 at the bottom, and put into this comment reply right here -->, (4 marks)
- Then read, review, and copy from the "Tips-Filling in your daily entries" section found in the first column near the bottom below that, and put into this comment reply right here -->, (4 marks)
- for a total of 12 marks.
The information on your daily journal will may be used to summarize your accomplishments end of the course reporting on tasks completed and your learning process through your newly acquired knowledge, skills, and values. This will be a part of your culminating work to showcase your overall progress, process, and learning throughout the course.

Common Things to Know, to Maximize Your Journal Mark
The following points should be kept in mind when filling in your daily entries. Most common place that marks are lost is being too vague or not specific enough with your details in each of the cells. There are common concerns, issues, and problems that students should be aware of:
- Include all class and individual tasks, during period
- Include three things learned in the form of K, S, and/or V
- Careful not to repeat the PT task in the learning section, be specific and detailed to your experience
- Remember not to repeat previous learning, as that is no longer new, and not worth marks
- Be specific with your new learning entries as a generic broad entry means you learned all of it, limiting what you can put down in the future
- You are responsible to work with partner and collaborate, so make the effort to work with someone, so you can report it
- You are expected to clean-up, organize, and sanitize at the beginning and end of the period, so participating here = marks
- Hmwk must always be filled in with something to support that day, to finish work, and/or support next day/project
What if You Miss a Day? How to Still Get Those Marks!
You may have missed a class for a number of reasons. If you are have to miss a class and can control which day, prioritize which day by looking at asynchronous, synchronous days first before missing in-person days. Remember that asynchronous days can be flexible if necessary... i.e. even though you may, for example, have slept-in, you can still put the independent time in, later in the day.
Here is what you can do to get your journal marks back for the day you missed by filling in the following box/cells:
- Attendance: Fill in as usual - AB with reason, time missed, and your homework,
- Topics: what did you miss, - see online journal and speak to partner to get the full picture/details,
- PT - what you could have worked on and completed,
- Partner - who you checked with, to get class details,
- KSV - what you plan to do, to catch-up - i.e. review material missed, discuss with partner, what you could do to catch-up,
- Clean-up cell- if you were able to catch-up and do some work, what you did to actually to catch-up, or just put not caught-up,
- Hmwk - What you can do to prepare for the next day
This will get you 6 out of 10 marks (showing your attention to what was missed and your good intentions to catch-up) the next day, otherwise it will be late. Also: If you can bring/show the work completed for lesson/topics and PT work missed the next day, then you will also get the last 4 marks for a 10/10
Evaluation:
Although these are not heavily weighted, they are important project assignments that will benefit you throughout the rest of this course. Here you can see a student journal sample that have a lot better entries and here is an excellent student journal sample done really well, both done in another class subject, but similar class situation.

| Evaluation Breakdown Component Descriptions | Marks |
|---|---|
| Always double check that you have completed all components for full marks. | |
| Survey - Answer all 12 questions fully | 12 |
| Course Outline Signed - Review, highlighting, and signed by parent | 10 |
| Tech Info - 10 course components, highlighting, and two peer contacts | 14 |
| General Safety Contract - Read, highlighting, signed by student & parent | 10 |
| Shortcut Test - Shortcuts done, folders created, and file named correctly | 15 |
| Journal Comments - Removed header row, review, copy, and comment reply | 12 |
| Daily Journal Entries - specific details, 10 marks daily @1/2 weight, entered weekly | 50 |

Conclusion
If you feel comfortable that you know all the details of the class/course details, you are ready to move on to the next activity. Be prepared to use what you learned in this unit activity to apply to future class work and process. At this point you should be ready for the rest of the course for use with computers, keeping organized with binder and digital files, routines, daily journals, and general safety. If you are still having trouble with specific things, PLEASE ASK!
Unit 1, Act. 2: Related Career
Situation:
Situation of this project is the big picture of this project/situation.
You are new to this field area, unfamiliar with possible career directions that this may offer and what steps may be taken to go into a related field.
Problem/Challenge:
This problem/challenge is what you need to accomplish.
Select a related career field that you may be interested in and research it to present in the form of a presentation 13 to 15 slides in length. The presentation slides to show titles and key information in different forms such as text, charts, maps, illustrations, and/or images. Text points should be 50-60 % of slide while images and/or charts should be no more than 40-50% of slide. Content on slides must include the following topics (bracketed info is extra explanation of what is on those slides):
- Job Title and General Description
- Contents/overview
- Responsibilities (daily expectations)
- Salary/Wage Levels (based on current entry, mid level, senior level positions, company, and location)
- Related Skills (soft and hard skills)
- Interests (hobbies, spare time, games, material things, sports, relaxation, health)
- Values (opinions, importance of specifics, beliefs, standards, commitment)
- Schooling (possible schools, program information, application, etc.)
- Preparation (what you can do now, resources, planning, all the facts, building maturity/responsibility, etc)
- Requirements (related association, certifications, what you need to accomplish, complete, learn, experience, etc.)
- Future forecast/outlook (3, 5, & 10 years down the road, stats on growth rate, comparisons)
- Summary/Conclusion
- Resources and Further Support (your research sources used, great places to check for more info, etc.)
Investigation/Ideas:
The Investigation/Ideas is where you will find support information that can help you with your project.
The first task involves selecting a related career field in the Communications Technology Digital Arts sector, that you may feel interested in learning more about. If you are having trouble deciding on which field, you could try an Online Employability Skill an Attitude Quiz or Self Assessment tools to help you decide which field might be best suited to look into. Below are some resource links to get you started with finding more information on a career field:

- Job bank
- Ontario college program find
- Salary & Careers
- Digital Art
- Pay scale Canada
- Ontario job futures
- The Balance Careers
- Art/Design Programs
- ZIPPIA
- Learning Path
- Art Careers
- Graphic Designer Info
- Design Job Titles
- How to Become...
- Online Design Teacher
- Grant Search Engine
- Present competently
- Deliver presentation
- Career One Stop
 Present well, 4.22
- Give a great presentation, 7.04
Choosing a career as a student can be very difficult when you don't have enough information to make the right decision. Using Google Slides will be your best practical option although Microsoft's Power-point, Prezi, or similar presentation software could be also used to design some really interesting and dynamic presentations. An important place to start, to get information on your career field, will be to look at related associations (official and unofficial) and school programs that support the industry, that area you are looking up.
Related Career Videos

- Career Advice: How to choose the RIGHT career, 19.01
- 6 Types of Graphic Design Jobs, 5.47
- Life as a Graphic Designer, 22.12
- Those "OTHER" art jobs in the game industry, 14.56
- College Search: How to Choose the Right College, 1.42
- Six Destinations: Career Choices, 6.12
- What Should I Do With MY LIFE?, 8.56
Resource links
Check out these resources for your PPT creation and presentation:
- Custom Google Slides
- 20 PPT Great Designs
- 108 Best PPT Ideas
- Lots of tips
- PPT Design Tips, 4.04
- PPT Design, 5.42
- Rule Of Thirds, 7.08
- Effective Slides, 16.24
 Effective PPT's, 16s
- Effective PPT's, 55s
- Great Examples of PPT
- More PPT examples
- Better presenter, 1.35
- Use Your Voice, 2.28
Create/Construct:
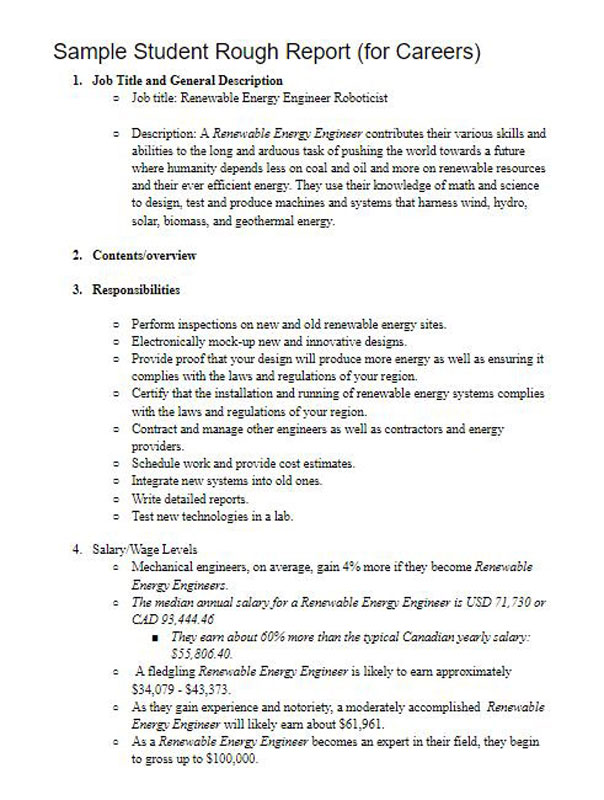
Sample Rough Report PDF
The Create/Construct step, is the point where you pick your best solution after you have exhausted all your investigation and ideas step to following through building or completing something. This is where you will find instructions/steps in these unit activities to complete the assigned project.
Major Steps
- Get a copy of the handout info and eval for an overview of your research project, general instructions, requirements, and mark breakdown for you to keep in your binder
- Choose a unique Communications Technology related career, using the sign-up sheet that will be provided
- Copy the topics to a doc file as a guideline for areas to research (template)
- Research your topic areas, compile all of your information
- Create a customized template for your presentation
- Add your content from your rough report, 4-6 detailed points and image(s) to each of your slides
- Add talking points (only presenters can see) for each of your slides
- Practice presentation for preparedness, clear communication, and timing (4-5 minutes)
Details

Your presentation should have large printed points that you can use to expand and talk about during your presentation. Your presentation points should also answer/cover the required topics with some detail.
- You are to create a rough career report showing key points of your interested technology related career
- Remember any digital content to include title, name, date, section, along with file naming convention.
- Start your research by copying the requirement topics to a word processor application, change your topics to separate headers, then add your researched information below each of the header topics along with source links at the bottom as you get them, i.e. focus on your research first, the key information required for this presentation
- Next, create your presentation template/format that will accommodate, a header/footer, title, key points, and a supporting image(s) for each slide approximately 50/50 ratio. The key points must be large enough to easily read from back of room on class projected screen, have high contrast to background
- For the actual presentation, you are to talk about (do not just read presentation slide points) details of each topic in detail, and be prepared to answer questions details at the end of your presentation from your partner timing/peer marking you. Presentation to be approximately 14 slides with about 20 seconds per slide on average to cover the 4-5 minimum presentation time length
- Check out 20 Great Examples of Power-point Presentation Design, 108 Best Presentation Ideas, Design Tips & Examples for ideas and best practices plus further tips can be found here
- When complete, submit your presentation in both Google Classroom and the drop-off folder (export as a PDF) on or before the due date with standard file naming convention, ex: tgj2-1a_d-joe_career-eng-field.xxx. All presentations will be copied to the pick-up folder to share with everyone in the class as a resource to keep for current and future interests
- Prior to presentation, use the self and peer evaluation table to double check that you have all required information. 2 marks will usually represent at least a minimum of 4 detailed points of the related topic information, then you will need to work on presentation to the class, keeping the time between 4-5 minutes and about 3 minutes of questions/discussions maximum if needed
Evaluation:
The evaluation step of SPICE, is the last part of the process, but not necessarily the step, as sometimes looking back at the original "Problem/Challenge", you may find that some goals were not met, meaning you may have to go back to your investigation step to see what else you can do to accomplish the original goals. This could be in the form of just realizing after checking the requirements/goals of project, or with collaboration with a peer, they have spotted room for improvement.
Ensure that you have completed all requirements, included related pictures, and lots of related resources. see ![]() handout info and eval for breakdown of marks, self and peer evaluation to be done at the time of presentation and handed in day of presentation. Here are two samples PPT: Sample 1, Sample 2. Also, you can check out these
handout info and eval for breakdown of marks, self and peer evaluation to be done at the time of presentation and handed in day of presentation. Here are two samples PPT: Sample 1, Sample 2. Also, you can check out these ![]() 2 self, peer, and teacher evaluation sample sheets.
2 self, peer, and teacher evaluation sample sheets.
| Evaluation Breakdown Component Descriptions | Marks |
|---|---|
| Always double check that you have completed all components for full marks. | |
| Researched Report - doc with all topics, related info, resources | 33 |
| Content - included all required information and resources | 20 |
| Layout - organized, visually appealing, and easy to read | 15 |
| Presentation - Content, communication, knowledge, and time | 20 |
| Self and Peer Evaluation - slides and presentation | 20 |
Unit Conclusion
Understanding about the course, routines, expectations, safety, assessment and evaluation, digital organization, journal entries, you will be able to maximize your learning and understanding. With your researched career and many related ones presented by your peers, will help you decide on possibles with your own future. Knowing this information will empower you and make you more confident where you want to take your future and what you need to do, to get there!