Unit 3: Computer Technology: Robotics and Control Systems

This unit focuses on the use of graphic, object-oriented programming to control larger scale robots. There are several ways you can control these robots using different hardware inputs and outputs to accomplish different tasks you may have need for. Being able to do this gives you experience in several areas of engineering all at the same time. Working with different electronic components, technical design, hardware devices, control mechanisms, math, electricity, pneumatics, wireless communications, networking, etc. are some of the areas you will be able to explore.
Unit Content Activity Quick Links, Click to Jump to Specific Activity!
Unit 3, Act. 1: Introduction to LabView
Situation:
A class of senior robotic students with different levels of knowledge and skills have the opportunity to work with our FIRST robots using LabVIEW to gain experience with it's type of programming along with larger scale devices and challenges. Some students have already had the opportunity to work with LabView, while others are seeing this for the first time. The robotic team, which competes annually with the FIRST robotics competition is always looking at being able to control these robots to accomplish specific tasks depending on the competition rules that year. Students who are, work hard to proficiently program and control these robots to complete specific tasks will gain immense skills and knowledge in this field of opportunity.
![]() Experience with LabVIEW is not only helpful to your future, but also combined with hardware, electronics, computers, and design is a high demand skill-set to have for your future employment and education in this field of engineering..
Experience with LabVIEW is not only helpful to your future, but also combined with hardware, electronics, computers, and design is a high demand skill-set to have for your future employment and education in this field of engineering..
Problem/Challenge:

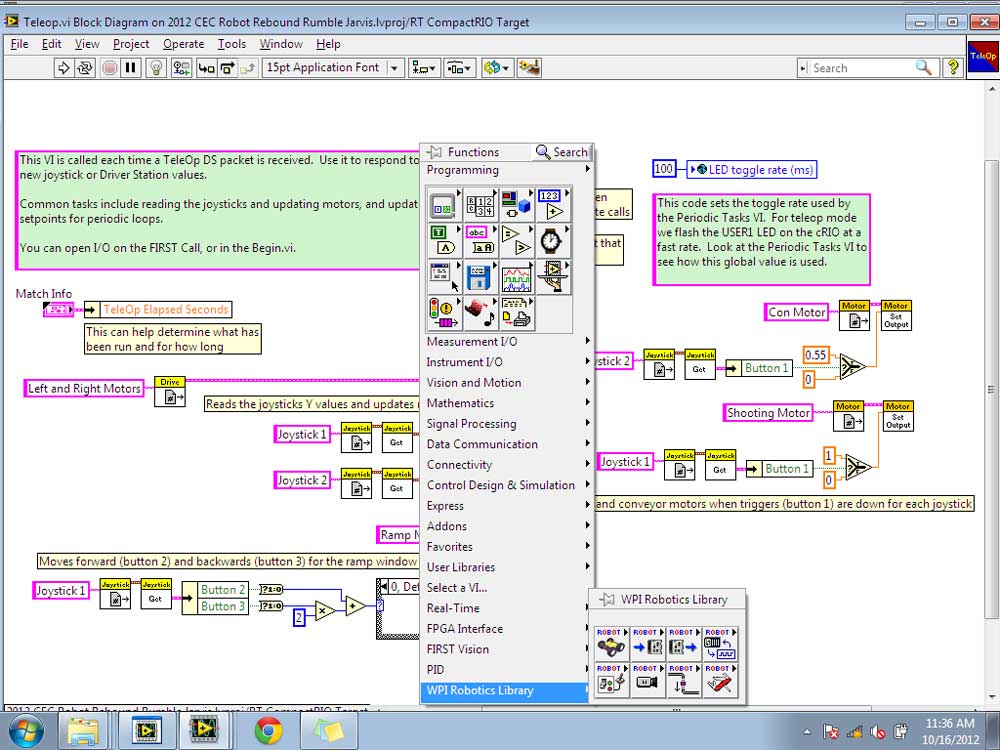
Students are to further their programming skills and knowledge using LabVIEW to control our FIRST robots. Initial projects include programming different drive systems found on the robots using a single joy stick and/or dual joy sticks control and then moving on to camera, pneumatics, sensors, rheostats, encoder feedback, speed control, autonomous modes, etc. Depending on previously accomplished robot tasks, students will continue from that point to gain more experience by selecting a new programming task to complete.
Investigation/Ideas:
Taking a look at this general overview ![]() video and then this presentation on programming with LabVIEW
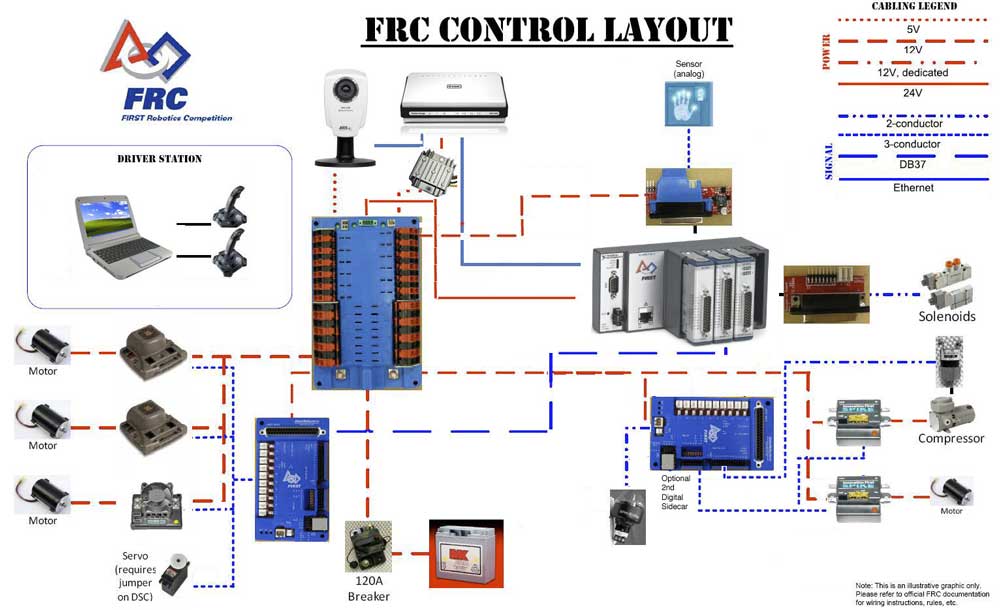
video and then this presentation on programming with LabVIEW ![]() is a great place to start if you have not worked with LabVIEW before. Although not necessary to view, this ScreenSteps Live online step tutorial and information guide shows the technical set-up that FIRST robotic teams go through for setting up their robot with LabVIEW. If you are not to sure of the electrical hardware set-up with a basic FRC robot, this FRC Kitbot Electronics Build
is a great place to start if you have not worked with LabVIEW before. Although not necessary to view, this ScreenSteps Live online step tutorial and information guide shows the technical set-up that FIRST robotic teams go through for setting up their robot with LabVIEW. If you are not to sure of the electrical hardware set-up with a basic FRC robot, this FRC Kitbot Electronics Build ![]() video goes through the build steps in about 26 minutes.
video goes through the build steps in about 26 minutes.
As a student working with the FIRST robotics, you have access to their software, so if it is not already installed on your computer or is out of date, you will need to install the software before you can start programming, of which, we already have the install disk and serial. You will also need to install some updates which you can find here. On a side note, there are two other sequential text based languages that can also be used, namely Java and C++, LabVIEW is a graphical based programming that tends to be more of a data acquisition focus and an easier language to pick-up, but outside the FRC Robotics, Java and C++ are more typically used to make programs, but more difficult to pick-up, although all can do the same for the purpose of programming your FRC Robot.
Below shows 25 different programming tasks that students shoud be able to complete, so that they may be ready for the demands of whatever the FIRST robotic challenges throws at teams each year:
- Read Joysticks and buttons from Gamepad
- Output values to a motor
- Output values to multiple motors
- Read values from a switch
- Read values from a sensor (potentiometer, angular rate sensor)
- Read values from wheel encoders
- Display a value from the robot on the PC screen
- Display a value in the form of a visual gauge on the PC screen
- Understand how to use Debugging & Development Features of FIRST control system
- Use Joystick values to control a mulitmotor drive system with and without a shifter
- Implement various joystick scaling methods (e.g. "deadband removal", "dynamic zeroing")
- Implement various output scaling methods (e.g. "linearize Victor")
- Implement a PID Feedback Loop on an arm or actuator
- Implement a PID feedback Loop on robot wheels
- Control a PID Feedback Loop via Joystick
- Control a PID Feedback Loop via buttons
- Use Angular Rate Sensor and Encoders to improve high speed "Drive Straight" Performance
- Use Angular Rate Sensor and Encoders to improve low speed "positioning" performance
- Basic Autonomous: sequence of steps in series
- Medium Autonomous sequence of steps some series, some parallel
- Medium High Autonomous including straight line robot motion back and forth with other steps
- Difficult Autonomous robot motion including turns
- Very Difficult Autonomous using camera to auto target using both arm and robot motion
- Use NetworkTables to implement Full Robot Monitoring System
- PC Based Vision System Based Targeting (height, distance, & angle wrt Robot)

There are a lot of resources online. Here are some of the better ones that show a lot of great tutorials, documentation, and videos that can be very useful to check out. The last two links are libraries for FRC C++ and Java..

Resource Links
- National Instruments Student Community
- FRCMastery.com
- FRC Training Material and Resources
- National Instruments LabVIEW Environment
- LabVIEW for the FIRST Robotics Competition Guide

- WPI FIRST Robotics Resources
- Nortel Wiki - LabVIEW
- Quick Reference Card
- LabVIEW Wiki
- Hauppauge Robotics - LabVIEW
- Hauppauge Robotics - Hardware
- WPILib Project Documentation
- University Tutorials
- LabVIEW for FRC

- LabVIEW for FRC Part 1
- Intro To LabVIEW
- Robot Builder Tool
- WPILib Robotics Library - FRC C++
- FRC Java API
Create/Construct:

Continue to fill in your SPICE Individual Task-Process Reports ![]() with your daily and weekly progress. Everyone will also contribute there own information based on a wiki category depending on what they are doing. For example, if a person is starting out by setting up a single joystick to operate the mechanum drive bot, then they would enter their related information in the "Mechanum Drive Robot" wiki page under a heading of "Singe Joystick Drive" and enter in those details, resources, links, pictures, tips, etc on how you are completing this.
with your daily and weekly progress. Everyone will also contribute there own information based on a wiki category depending on what they are doing. For example, if a person is starting out by setting up a single joystick to operate the mechanum drive bot, then they would enter their related information in the "Mechanum Drive Robot" wiki page under a heading of "Singe Joystick Drive" and enter in those details, resources, links, pictures, tips, etc on how you are completing this.