Unit 5: Computer Technology - Culminating
The culminating will include major topics: computers, circuit calculations, digital logic, and the boe-bot .
Course Units and Descriptions
Use this table for an overview and navigate to each of the course unit pages.
| Unit | Description |
|---|---|
| Review course outline for more details | |
| 1 | Careers & Safety- Intro, computers, organization, safety, and research careers |
| 2 | Computers- organization, hardware, design, software, maintenance, building, repair, and troubleshooting |
| 3 | Circuits- Electrical characteristics, calculations, components, digital logic design, project build, and troubleshooting |
| 4 | Tetrix-Bot- micro controllers, electronics, robot builds, circuit building, programming, robot navigation, testing, and troubleshooting |
| 5 | Web Portfolio- Showcase course work, projects, and understanding with web portfolio and presentation |
Unit Content Activity Quick Links, Click to Jump to Specific Activity!
- Unit 5, Act. 1: Computer Design Build
- Unit 5, Act. 2: Circuit Calculations
- Unit 5, Act. 3: Digital Circuits
- Unit 5, Act. 4: Tetrix Custom
 Unit 5, Act. 1: Computer Design Build
Situation:
The class have looked at computer parts with a build session, applied SPICE to design steps for a custom gaming system, and did a complete tear-down and rebuild of a computer with partners. Through this process students have gained some theory and practical experience to futher apply towards design steps to other computer systems and gives students a great insight into how and why computers are designed the way they are.
Problem/Challenge:
Design a specific custom desktop computer system from scratch for yourself. The design/build is to include the following:
- System type/category and specific requirements you need it for
- Decide on a realistic budget cost with maximum cost limit $4, 000 for your computer and required periphials
- Component information on pictures, local best price, and supplier(s)
- Cost analysis- why each part should work well in your system based on price and needs, with a quick explanation and support review links
- Your10 build process steps
- Total component power wattage with individual component watt demand breakdowns
- Summary, conclusion, and key insights on your design build
- References to include resources and suppliers

Investigation/Ideas:
Using the SPICE model, with the Situation being the big picture, the Challenge is the first thing is what your current and future requirements will be for your specific computer type. Here is a ![]() handout that supports and outlines this project in two of pages. Below is a list of some computer types that you may consider.
handout that supports and outlines this project in two of pages. Below is a list of some computer types that you may consider.
- Budget Desktop
- Home Office
- Gaming System
- Media Center
- CAD Workstation
- Web Server
- Streamer
- Audio System
- NAS Server
When looking at designing and building a system from scratch, there are many things that need to considered in part of your planing. It is easy to copy or pick a preconceived set-up, but you will need to research and explain why you have selected those particular components based on price, performance, specifications, compatibility, and your needs. Here is a video: ![]() ULTIMATE Build a Better $1500 Gaming PC Computer "How To" Guide showing a new computer build with details as to why certain products were selected.
ULTIMATE Build a Better $1500 Gaming PC Computer "How To" Guide showing a new computer build with details as to why certain products were selected.
Create/Construct:
Create/Construct points-steps:
- Make a List of uses you will need the system for, and the type of system (prove your system need)
- Depending on your needs, determine your components in priority of importance, example - gaming system depends a lot on graphic output, so graphic cards would be a place to start
- Use PC Part Picker to select your components
- Each component in order of priority importance is to have picture, description/specs, explanation, wattage, local price, and supplier
- A slide representing your build process steps and explanation for those steps
- Create a power point presentation to show off your system of design and include your introduction, overview, component details, build process steps, summary chart with wattage and prices, conclusion, suppliers and references
- Overview should explain system type based on your requirements
More Information & Support
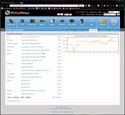
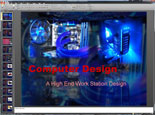
Below are some related images to give you an idea on PC Part Picker build page, summary page, and Power point.
Evaluation:

Below shows a repeat of the breakdown that was used to evaluate your computer design presentation.
| Evaluation Breakdown Component Descriptions For Presentation | Marks |
|---|---|
| Always double check that you have completed all components for full marks. | |
| Computer Info - Intro and overview -system type based on req. | 5 |
| Components - Components with images, descriptions, explanations, specs, and price | 10 |
| Build Process - Steps outlined to take during the build process including safety | 5 |
| Summary Chart - components, descriptions, price, wattage | 5 |
| References & Suppliers - List all support links, reviews, and suppliers | 5 |
 Unit 5, Act. 2: Circuit Calculations
Series Parallel Calculation
This project you will be handed out a calculation sheet similar to what we did in class. You will calculate and show all work the same way we did in class for previous calculations. You will have one period to complete the calculation during class to be handed in at the end of the period. It is suggested to review your past calculation sheets.
Evaluation:
Each servo built will have different results because they are slightly different in the quality and build of their internal components. Using someone else's work will make your programing in later projects difficult as you will not have values recorded for your own servos, making those projects twice as hard both time and effort.

| Evaluation Breakdown | Marks |
|---|---|
| Always double check that you have completed all components for full marks. | |
| Series Circuit 1 - Formulas, units of measure, rough calculations, answers circled, & chart | 12 |
| Parallel Circuit 1 - Formulas, units of measure, rough calculations, answers circled, & chart | 12 |
 Unit 5, Act. 3: Digital Logic

Logo!soft - Forward/Reverse Motor Control Circuit Build with Time delay
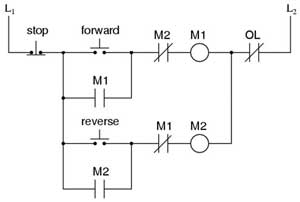
- With LOGO!soft using the forward/reverse circuit diagram given (power cct), create the digital logic equivalent using any of the common logic gates with the given .LSC template, following the same process as last circuit design
- 2. Include a green pilot light indicator for when the forward coil is on and a red pilot light indicator for the reverse coil is on
- One additional step will require a 4 second timer delay between switching directions
- Once you have a finished the digital logic equivalent circuit with overload and it is working correctly with inputs/outputs/functions are placed properly, organized and aligned with best wire routing, and labeled, hand-in both the exported .JPG and the .LSC file attached in that order for evaluation
Evaluation:
Circuit must have a centred header with a title, name, and detailed description of the circuit requirements and operation, and include the three major sections of the circuit sub-titled: Inputs, Functions, and Outputs. Circuits are to be handed in both a LOGO!Soft Comfort Drawing file .lsc and an exported .jpg

| Evaluation Breakdown Component Descriptions | Marks |
|---|---|
| Always double check that you have completed all components for full marks. | |
| Forward cct - latched for interlocked cct starting with forward button & green pilot light | 6 |
| Reverse cct - latched rev interlocked cct, start with reverse button input & red pilot light | 6 |
| Timer delay - 4 second delay between stops | 6 |
| Cct layout - Title, description, sub input/function/outputs, labels, org. | 7 |
 Unit 5, Act. 4: Tetrix Custom Build and Navigation Automation
Here is your opportunity to design a custom bot with your group partner(s) and show some custom individual programming.
Custom Build
Take apart your test bed station, and decide on custom robot build with-in the scope of Wheelee Bot used in Booklet Activities 6-15. Must use a minimum of two motors, one servo, one sonic sensor, and one line finder sensor. The pulse programming and/or prime builder guides may give you some ideas on a custom navigation build design. Advanced build could include the server being used with gripper kit or use the servo for steering.
Custom Navigation
Create a custom navigation program that uses a combination of dead reckoning (time and speed) to avoid two obstacles, sonic sensor, and line sensor to create a combination automated navigation from a start point to a finish point utilizing all above components, traveling about 7-10 floor tiles in distance. LED's to be used to indicate green for forward, red for reverse, and yellow for program transitions and/or signaling. Servo can be used to support, signal, or grip while you are running your custom individual navigation. Use of black electrical tape to be used to also support your unique custom navigation. Remember to use coding standards and expectations including multi-line name, date, section, and description at the beginning of your program, and throughout your code to identify inline new code in your program. Be prepared to explain and demonstrate your custom nav programming code as part of the mark.
Report
With provided report template, complete title page with picture and your information. Write a description overview of your robot design build and components used, then explain your unique custom navigation steps it will be doing in point form. Insert your individual unique custom code with block and inline comments with aligned steps. Finish with your 5 summary conclusion points to be submitted as a Google Doc.
Evaluation:
Ensure you double check all instructions carefully, have your custom nav Tetrix bot built securely with wires safely routed and organized, test code and bot before demonstrating to instructor, and work on report in tandem, putting in your code last, to submit when done demonstration.

| Evaluation Breakdown of Boe-bot Navigation Tasks | Marks |
|---|---|
| Always double check that you have completed all components for full marks. | |
| Custom Robot Build - All componnts req and secure, wiring organized, and design | 10 |
| Bot Custom Nav - Dead reckoning *2, sonic & line sensor, 2 motors, 1 servo, 7-10 tiles | 10 |
| Tetrix Bot Report - Title page, description, steps & nav pic, program code, and learning | 15 |


