
Unit Content Activity Quick Links, Click to Jump to Specific Activity!
- Unit 4, Act. 1: Tetrix Introduction
- Challenge, (Invest) What is Tetrix, Safety, Code Standards,
Coding Tips, Activity videos, (Create)Tetrix Background, Programming, Evaluation - Unit 4, Act. 2: Tetrix Build and Navigation
 Unit 4, Act. 2: Tetrix Build and Navigation
Situation:
Now that students are familiar with the Tetrix kit (inventory check and balance), some basic coding, servo operation, and sensors, students are ready to explore a little more in-depth with the autonomous robot features. To create some more advanced programming automation, the Tetrix bot build will be needed to combine kit components for more coding sequences.
Problem/Challenge:
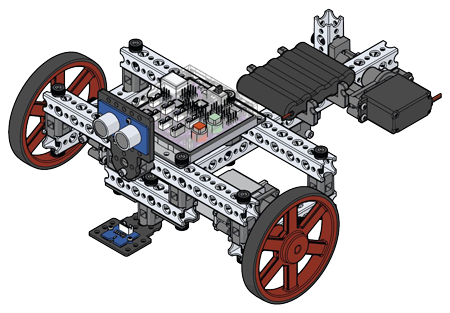
Students are to complete activity 6, to build Codee using the steps found in the programming guide provided. Once Codee is built, students will work through activities 7-15 running code for; driving forward, circle, square, to a line, follow a line, wall stop, avoiding obstacles, and combining sensors. Each of the activities will require you to customize your coding to do 4 new task/features, based on current given coding exercise activities along with the proper coding standards, documentation, and defining new code functions used. Once finished all of the activities with your individual custom coding, a document report with title page to include picture of your bot, overview, your coding (sample and custom), and summary, will be submitted for a report mark.
Investigation/Ideas:

Build time with your partner should be less than an hour, allowing you to get coding relatively quickly. The ![]() Tetrix Prime Builders Guide has multiple sample robot design ideas, but as you will be using the Tetrix Prime controller with Arduino programming code with the activities, the
Tetrix Prime Builders Guide has multiple sample robot design ideas, but as you will be using the Tetrix Prime controller with Arduino programming code with the activities, the ![]() Tetrix Prime Pulse Programming Guide will be better to follow here. This programming guide gives you great information and illustrations on getting started with your Codee bot build. Here are some of the highlights you should check out:
Tetrix Prime Pulse Programming Guide will be better to follow here. This programming guide gives you great information and illustrations on getting started with your Codee bot build. Here are some of the highlights you should check out:
- Parts Index, p47
- Servo Assembly, p54
- Construction Tips, p61
- Wheel/axle build, p67
- Codee Bot build steps, p69-87
One of the first things you will have to do is to build a bot using the building components from the Tetrix Prime kit. The following are some points to keep in mind when building your bot.
- Use the right tool for the right job
- Don't over tighten, snug tightness only
- Rivet and thumbscrews for fastening
- Use bronze bushings with D axles in beams
- Standard servos only have limited rotation (180 degrees)
- Mount battery securely
- Ensure cables are secure
- Ensure your electrical connectors are properly connected (match wire colours)
- Handle bot carefully as sensor brackets are easily broken
- Run program only when safe to do so, on floor or wheels jacked off surface
- Do not run robot on a table, use floor
Activity Videos
Use the videos below in addition to the guide steps to gain more insight into each of the activities.
- Build a Tetrix Prime Wheelee Bot 18.34
- Activity 7: Drive Forward 4.50
- Activity 8: Drive in a Circle 3.56
- Activity 9: Drive in a Square 6.14
- Activity 10: Simplify the Square 4.35
- Activity 11: Drive to a Line and Stop 4.56
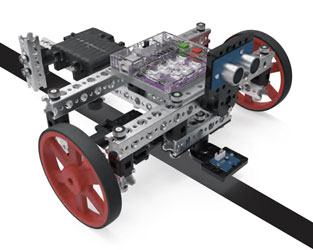
- Activity 12: Follow a Line 4.32
- Activity 13: Drive Toward a Wall and Stop 5.17
- Activity 14: Avoiding Obstacles 4.13
- Activity 15: Combining the Sensors 6.53
Create/Construct:

You are to build your PULSE Codee Bot, have it inspected by a peer group before getting approved by the instructor. Once given the go to start coding, follow the activity guides to run different navigation codes given, then as before, add 4 additional program features to individually expand/customize on the activity. You are to document your custom code in the Arduino IDE editor with your information and the bots 4 new programmed features and save the code for your report later.

- Activity 6: Build the PULSE Codee Bot - follow the guide and/or video demo
- Activity 7: Drive Forward - move the Codee Bot forward for three seconds and stop
- Activity 8: Drive in a Circle - move Codee Bot in a preset diameter circle
- Activity 9: Drive in a Square - make 90-degree turns to make the Codee Bot drive in a square
- Activity 10: Simplify the Square - another simpler way to drive in a square
- Activity 11: Drive to a Line and Stop - using the line follower sensor, have Bot stop at a dark line
- Activity 12: Follow a Line - create different curves for bot to follow
- Activity 13: Drive Toward a Wall and Stop - using the sonic sensor, have bot stop a set distance from wall
- Activity 14: Avoiding Obstacles - program different direction if something is in the way
- Activity 15: Combining the Sensors - combination of all to do multiple tasks autonomously
Remember to save work with a folder, class file naming conventions, coding standards, including commented in order of date, course/section, name, and description with new lines of code showing definition/explanations. A final doc report will include a title page, with picture of one of your circuits in action, an overview, all your code activities (sample and custom), below code state 3 real life applications and related careers and a final summary conclusion.
Evaluation:

Each Tetrix custom activity task is to be checked by the teacher before moving on to the next project. Remember code writing conventions for each of the program tasks to be done.

| Evaluation Breakdown | Marks |
|---|---|
| Always double check that you have completed all work for full marks. | |
| Activity 6 - Build the PULSE Codee Bot | 40 |
| Activity 7 - Drive Forward | 10 |
| Activity 8 - Drive in a Circle | 10 |
| Activity 9 - Drive in a Square | 10 |
| Activity 10 - Simplify the Square | 10 |
| Activity 11 - Drive to a Line and Stop | 10 |
| Activity 12 - Follow a Line | 10 |
| Activity 13 - Drive Toward a Wall and Stop | 10 |
| Activity 14 - Avoiding Obstacles | 10 |
| Activity 15 - Combining the Sensors | 15 |
| Programming Report and Code - All sketches in a doc format | 50 |
Unit 5: Computer Technology - Culminating
The culminating will include major topics: computers, circuit calculations, digital logic, and the boe-bot .
Unit Content Activity Quick Links, Click to Jump to Specific Activity!
- Unit 5, Act. 1: Computers
- Unit 5, Act. 2: Circuit Calculations
- Unit 5, Act. 3: Digital Circuits
- Unit 5, Act. 4: Boe-bot
Unit 5, Act. 1: Computers 
Computer Build Design:
Earlier this semester you finished a project that was to design a computer from scratch based on required needs and show a presentation on your components, prices, and build process. This project has already been marked and is currently recorded as part of your term mark but will be changed to go towards you culminating mark which is out of 50 marks.
Evaluation:

Below shows a repeat of the breakdown that was used to evaluate your computer design presentation.
| Evaluation Breakdown Component Descriptions For Presentation | Marks |
|---|---|
| Always double check that you have completed all components for full marks. | |
| Computer Info - Computer type, overview of system, general considerations covered | 5 |
| Components - all components with images, descriptions, explanations, specs, and price | 20 |
| Build Process - Steps outlined to take during the build process including safety | 5 |
| Summary - components, descriptions, price, wattage | 5 |
| References & Suppliers - List all support links, reviews, and suppliers | 5 |
| Overall Presentation - PPT, Knowledge, Communications, and Technical Opinions | 10 |
Unit 5, Act. 2: Circuit Calculations
Series Parallel Calculation
This project you will be handed out a calculation sheet similar to what we did in class. You will calculate and show all work the same way we did in class for previous calculations. You will have one period to complete the calculation during class to be handed in at the end of the period. It is suggested to review your past calculation sheets.
Evaluation:
Each servo built will have different results because they are slightly different in the quality and build of their internal components. Using someone else's work will make your programing in later projects difficult as you will not have values recorded for your own servo's, making those projects twice as hard both time and effort.

| Evaluation Breakdown | Marks |
|---|---|
| Always double check that you have completed all components for full marks. | |
| Series Circuit 1 - Formulas, units of measure, rough calculations, answers circled, & chart | 20 |
| Parallel Circuit 1 - Formulas, units of measure, rough calculations, answers circled, & chart | 20 |
Unit 5, Act. 3: Digital Logic
Automated Mixing Tank System
Using Siemens LOGO! Soft Comfort software, build a digital circuit for a mixing tank system. As many food and drink products start out as a liquid this is very common in the food industry.
The System Components
Automated Mixing Tank
System Components
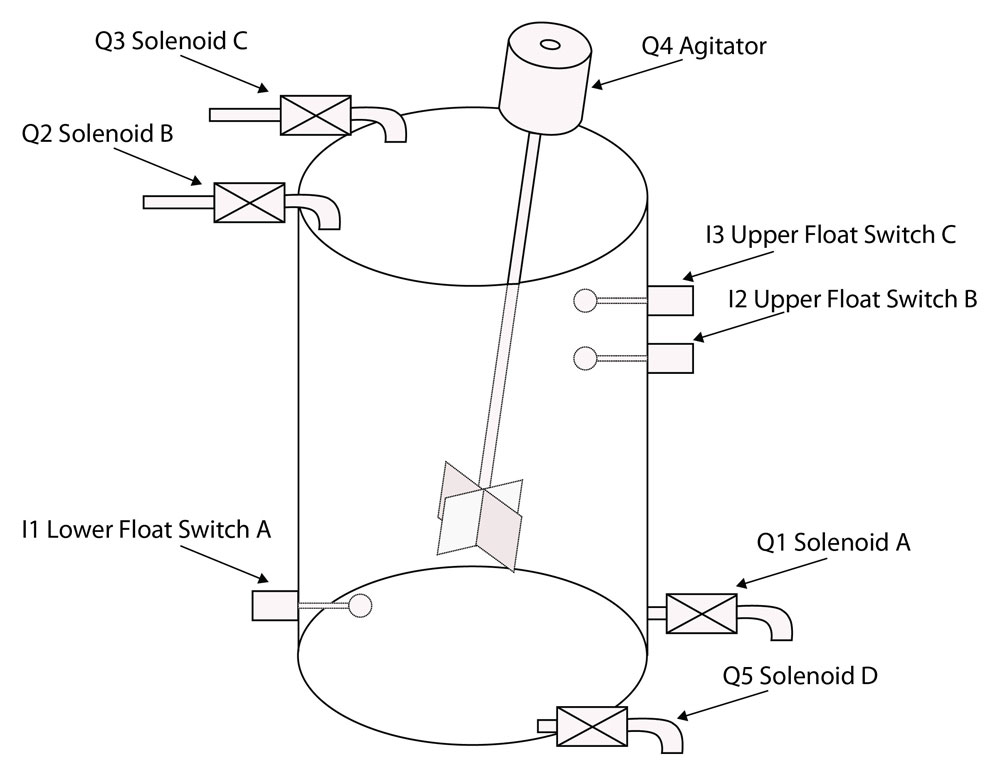
- Float switches - I1 lower float switch monitors low levels while I2 & 3 measure upper independent levels
- There are three separate strategic locations for momentary emergency shut down buttons (E-Stops) I4-6
- There are two operator control push buttons stations so as to control from two different locations at the same time, station 1 has I7 & I8, station 2 has I9 & I10
- IQ1 is a lower solenoid to pass mixed liquids to the next food processing stage.
- Q2-3 upper solenoids control the upper liquid levels
- IQ4 is the agitator or mixer
- Q5 is a solenoid drain, in case for emergency, this will be needed.
The Operation Cycle
- When a start button is pressed, solenoid B is energized and a batch B liquid enters the mixing tank
- Float switch B detects the required amount and stops batch B from entering tank
- then solenoid C is energized and batch C is poured into mixing tank until float switch C scenes it's level reached and stops batch C coming in
- The agitator begins to mix the liquid. The agitator mixes the liquid for 15 seconds and shuts off.
- After the agitator shuts off, lower solenoid A is energized to move the liquid to the next processing step
- If a stop button is pressed, the mixing process will stop/pause this part of the liquid processing step. When a start button is pressed again, the process will continue where it left off
- If the Emergency stop is pressed at any given point throughout the operation, the whole system stop and immediately drain the whole tank (q5 drain solenoid
Table of Inputs and Outputs and their Functions
| Inputs & Outputs | Function |
|---|---|
| I1 | Lower Float Switch A |
| I2 | Upper Float Switch B |
| I3 | Upper Float Switch C |
| I4 | E-Stop (momentary) |
| I5 | E-Stop (momentary) |
| I6 | E-Stop (momentary) |
| I7 | Station 1 Start Cycle (momentary) |
| I8 | Station 1 Stop Cycle (momentary) |
| I9 | Station 2 Start Cycle 2 (momentary) |
| I10 | Station 2 Stop Cycle 2 (momentary) |
| Q1 | Lower Solenoid A |
| Q2 | Upper Solenoid B |
| Q3 | Upper Solenoid C |
| Q4 | Agitator |
| Q5 | Drain Solenoid D |
Evaluation:
Circuit must have a centred header with a title, name, and detailed description of the circuit requirements and operation, and include the three major sections of the circuit sub-titled: Inputs, Functions, and Outputs. Circuits are to be handed in both a LOGO!Soft Comfort Drawing file .lsc and an exported .jpg

| Evaluation Breakdown Component Descriptions | Marks |
|---|---|
| Always double check that you have completed all components for full marks. | |
| Start Cycle - Starting process energizes solenoid B & C | 5 |
| Tank Fill - upper float limit switch operation | 5 |
| Agitator Mixing/Timer -Mixing and timer, shuts off after 15 seconds | 5 |
| Finished Lower Output - Liquid batch B & C is mixed and moved onto next process | 5 |
| E-Stop/normal stop - Normal stop to pause mixing process, E-stop to drain and start over | 5 |
| Number of functions - not including I's and Q's, less results in a better mark | 5 |
| Final Circuit Design - Organized, neat, labeled, and working | 10 |
Unit 5, Act. 4: Boe-Bot
Custom Dead Reckoning
You will complete the custom dead reckoning map as instructed in unit 3 activity 3 for one of your culmination marks
Evaluation:
Each task program must be handed in with appropriate formatting, comments, and proper file naming. The bot must complete it's task accurately with in half the width of bot itself, i.e. end target goal location must have it between the wheels, every 1/2 inch of inaccuracy will cost marks
| Evaluation Breakdown of Boe-bot Navigation Tasks | Marks |
|---|---|
| Always double check that you have completed all components for full marks. | |
| Custom Course Mapping Graph- relevant course info, scaled to full page | 10 |
| 3d Bot Custom Course - Report -title page, program code, bot run accuracy | 40 |
| 3d Bot Report - Report -title page, map, program code, and learning explanation | 10 |
Unit 1, Act. 2: Custom Computer Design
Situation:
Class has now completed a tear-down and rebuild of a computer with partners. Through this process and a researched power point presentation have gained a lot of good practical experience. Familiarity with hardware components and the theory behind those components gives students a great insight into how and why computers are designed the way they are.
Problem/Challenge:
Your task is to design a custom desktop computer system from scratch. The design is to include the following:
- System type/category - list requirements and what type of system
- Cost limit $2, 000 in general - system type will determine reasonable price points
- Component picture, local best price and supplier(s)
- Cost analysis- why this part works well in your system based on price an needs including a quick explanation and support review links
- Build process steps
- Total component power wattage and cost breakdown
- Summary breakdown
- References - resources and supplier

Investigation/Ideas:
Using the SPICE model, Situation- what is the big picture, the first thing you need to figure out your current and future requirements would be, then come up with specific computer type. Here is a ![]() handout that outlines this project in a couple of pages. Below is a list of some computer types that you may consider.
handout that outlines this project in a couple of pages. Below is a list of some computer types that you may consider.
- Budget Desktop
- Home Office
- Gaming System
- Media Center
- Workstation
- Web Server
- Audio System
- NAS Server
When looking at building a system from scratch, there are many things that need to considered in part of your planing. Below shows a list of some of the things you need to consider.
General

- Practicality, reliable, compatible
- Quality, name brands
- Noise
- Cooling, amount and type
- Cost
- Speed
- Location where it will be used
- Power Source and conditioning
- Secondary Memory
- Scalability, future upgrades, options
- Major use type of machine
- Appearance
- Security
- Sound
- Network
Hardware Specifics

- CPU platform - memory and speed
- Video controller/platform
- Motherboard
- Case
- RAM
- Monitor (s) size & number
- Raid considerations
- Power supply
- Power back-up, Power conditioning
- Hard drive(s)
- Solid State Drives (SSD)
- Sound output
- Expansion cards
- Cooling air, liquid, combination
- Mouse/keyboard
- Fans
- USB 2-3
- Lighting
- Heat sinks
- Card readers, etc.
Although this project's extent is focused on hardware, software system, applications, and networking must also be considered.
Software and Applications:

- Operating system:
- 32/64 bit
- Multi-boot
- Boot disk
- Back-up
- Tools
- Utilities
- Partitioning
- Scratch disks
- Utilities
- Security
- Office
- Graphics
- Interest specific
- Smart phone sync
- Back-up
- browsers
- Desktop
- Games
Network:
- Provider speed, options
- Set-up
Computer components to the upper right are are based on a high-end workstation done up in PC Part Picker
Resource Links

- Rebirth of the Desktop
- Computer Parts Guide
- Buying Guide
- Intel and AMD Comparison
- Designing a Gaming PC
- Guide To Basic PC Cooling
- Air-Cooled PC, Part 1
- Air-Cooled PC, Part 2
- Power Supply 101
- Best Computer Cases
- Sample Computer Builds
- AnandTech Bench
- Choosing Computer Parts
- Tom's Hardware forum
- Logical Increments
- Reddit Build-A-PC
- PC Part Picker
- PC Part Picker - Build Tool
- Softonic
- Dream Machine
- $2000 Gaming Computer
- 2013 BestConfigs
It is easy to copy or pick a preconceived set-up, but you will need to research and explain why you have selected those particular components based on price, performance, specifications, compatibility, and needs. Here is a video showing a new computer build with some details as to why certian products were selected: ULTIMATE Build a Better $1500 Gaming PC Computer "How To" Guide ![]()
Create/Construct:
Create/Construct points-steps:
- List of uses you will need the system for, and the type of system (prove your system need)
- Depending on your needs, determine your components in priority of importance, example - gaming system depends a lot on graphic output, so graphic cards would be a place to start
- Resource links above will help, use PC Part Picker and/or Logical Increments for some guidance
- Each component to have picture, description/specs, explanation, wattage, local price, and supplier
- Build process steps you would take
- Create a power point presentation to show off your system of choice and include your introduction, overview, component details, build process steps, summary/tally with wattage and prices, conclusion, and references and suppliers
- Be prepared to explain your selections based on your requirements and computer type.
More Information & Support
Below are some images to give you an idea on what and how you can collect and present it.

Build Page

Summary

Evaluation:
Ensure you hand your power point presentation into the appropriate hand-in folder .
| Evaluation Breakdown for Presentation | Marks |
|---|---|
| Always double check that you have completed all components for full marks. | |
| Computer Info - Computer type, overview of system, general considerations covered | 5 |
| Components - all components with images, descriptions, explanations, specs, and price | 20 |
| Build Process - Steps outlined to take during the build process including safety | 5 |
| Summary - components, descriptions, price, wattage | 5 |
| References & Suppliers - List all support links, reviews, and suppliers | 5 |
| Overall Presentation - PPT, Knowledge, Communications, and Technical Opinions | 10 |
| What Did you Learn - Test your knowledge here: | |
| Moodle Test - Based on above work covered, log-in here, help with quiz access/process | 20 |
| Total Marks | 70 |