Unit 2: Computer Technology: Robotics and Control Systems
This unit focuses on robotic interface and controls with individual and group related projects. These projects attempt to allow students to select an appropriate and interesting direction.
Unit Content Activity Quick Links, Click to Jump to Specific Activity!
- Unit 2, Act. 1: Microcontroller Project Planning and Resources
- Unit 2, Act. 2: Programming and Project Build
Unit 2, Act. 1: Microcontroller Project Planning and Resources

Situation:
A class of senior robotic students with different levels of knowledge, skills, and, experience with microcontrollers (µC), programming, interfacing and controls are going to explore these areas further following personal areas of interest.
![]() Because you will be exploring and learning about your course related interest, you will assume ownership of your project direction.
Because you will be exploring and learning about your course related interest, you will assume ownership of your project direction.
Problem/Challenge:

Students with minimal experience or needing some review can start with smaller microcontrollers and work through several tutorials to learn the basics of open source microcontroller technology, programming, and interfacing along with different input and output devices such as LED's, Piezo speakers, servos, custom sensors, microswitches, etc with the intent towards a interested proposal for an interested project.
Students already with a base knowledge of this area will propose their idea(s) and group member(s) with an interested project direction. The project proposal will be reviewed with instructor prior to final OK, and must include a microcontroller and related input/output devices to achieve project goals.
It will be expected to create a plan, list of materials, researched resources, document in wiki, and progress updates. Nearing end of project or time permitting, a presentation will be also created and shared/presented to class showing your ideas, knowledge of your project, steps you took, your progress, current stage of your project, and future considerations.
As all students will be working on different projects, students will use a SPICE report to show daily and weekly progress. Daily entries will be a minimal point form notes as to what was accomplished and marked on a point/mark rating based on class duration. Weekly entries will be based on longer term project direction, showing project plan, research, and project stage summary.
Student knowledge overlap and common theory areas will be reviewed and shared to benefit everyone, either to demonstrate, consult, or support and used to also evaluate learning progress.
Investigation/Ideas:
Depending on the type of project you are going to work on, you will need to look at the appropriate hardware to match your needs. From the start it is important to set your goal, investigate and gather information, then start your build with the best possible direction in order to achieve your project goal. This process is also a critical part of you reaching your finished project and must also be used and understood.
Ideas
Here is a list of ideas with links that might be of interest for you to check out, and even if it is not quite what you were thinking, the project idea could be a new one based on someone else or just improving on their idea:

- ROV Undersea Robot
- Software Radio 1
- Software Radio 2
- Wireless Leash
- Gyrocopter
- Game Controller
- Google Glass
- Quadcopter
- Top 40 Arduino
- Arduino Projects
- Open ROV
- Student projects

- Cornell Projects
- Best Projects
- Projects Ideas
- Nerd Kits µC
- Ladkrabang µC
- DIY Projects
- 8051 µC
- Mini Projects Ideas
- Project Topics Info
- ElProCus
- Searched Projects
- µC Idea Book

- Project Abstracts
- Rickey's Projects
- PIC µC ideas
- Maker Media
- Unbelievable Projects
- Arduino-Projects
- Projects of 2012
- Top 5 Arduinos
SPICE Report Process
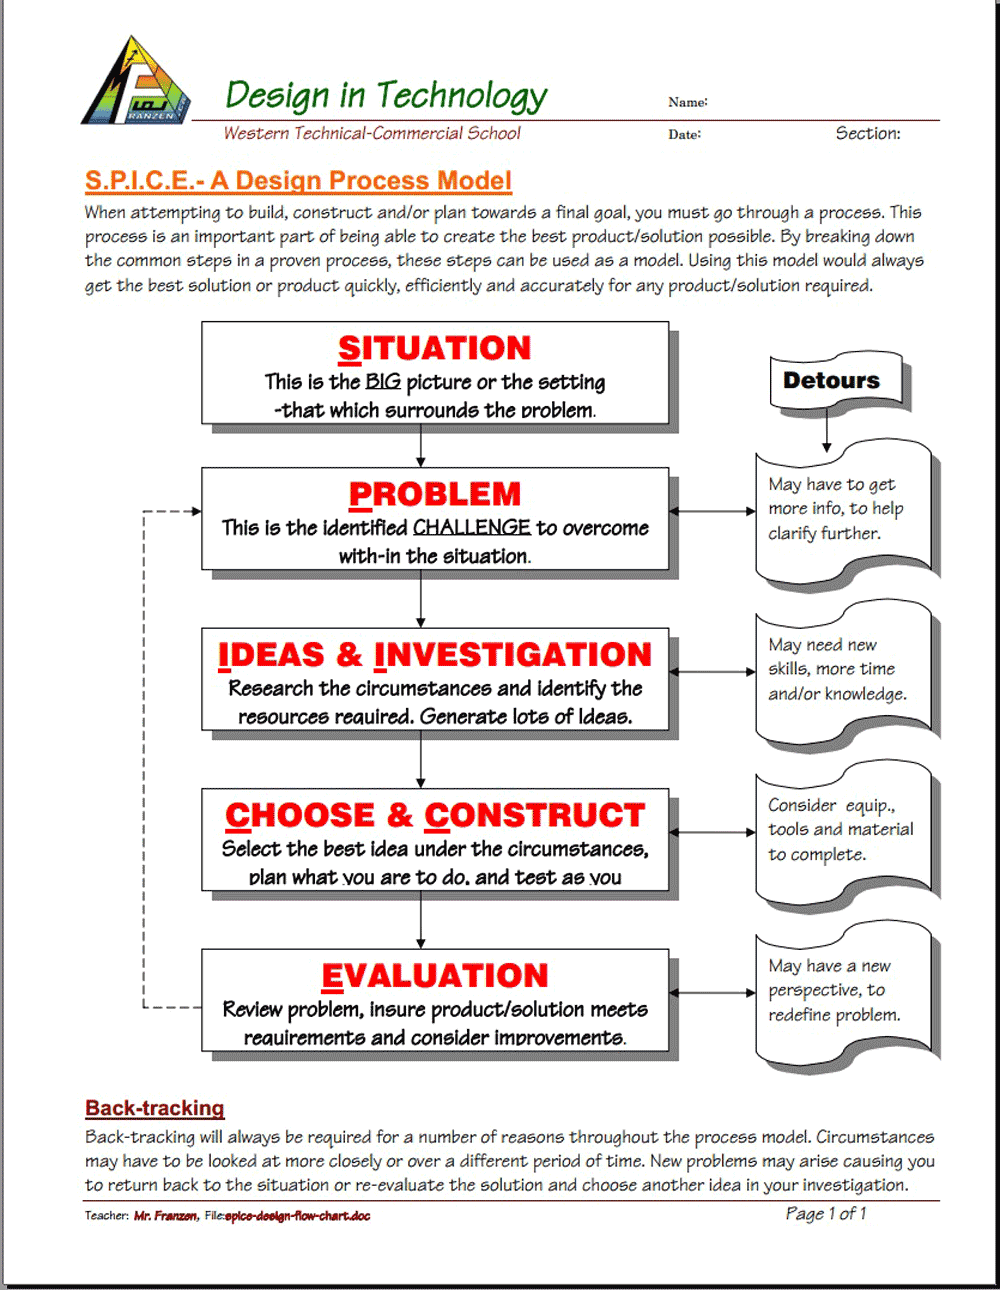
There are many design process systems/models out there to show how for example a microcontroller related project process goes through its steps/stages. We will focus on a simple model called SPICE to understand and report student progress. Using the SPICE Individual Task-Process Report to show your progress throughout your hands-on project. This keeps your work and accomplishments clear and organized, but more importantly it will also allow you to detail and summarize your project process and effort for record and evaluation.
- SPICE Design Process Model
- SPICE Individual Task-Process Report
- SPICE Individual Task-Process Report Sample
- A detailed look on technical design
- Six Models of the Design Process
- More on Design Process Models
 Microcontrollers
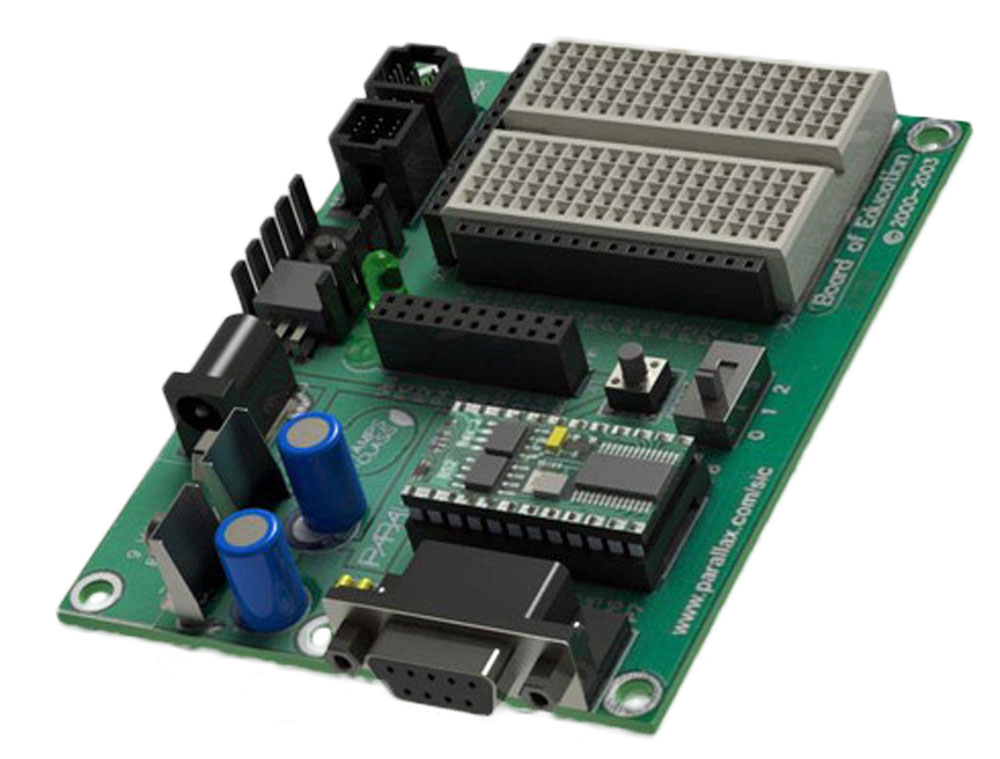
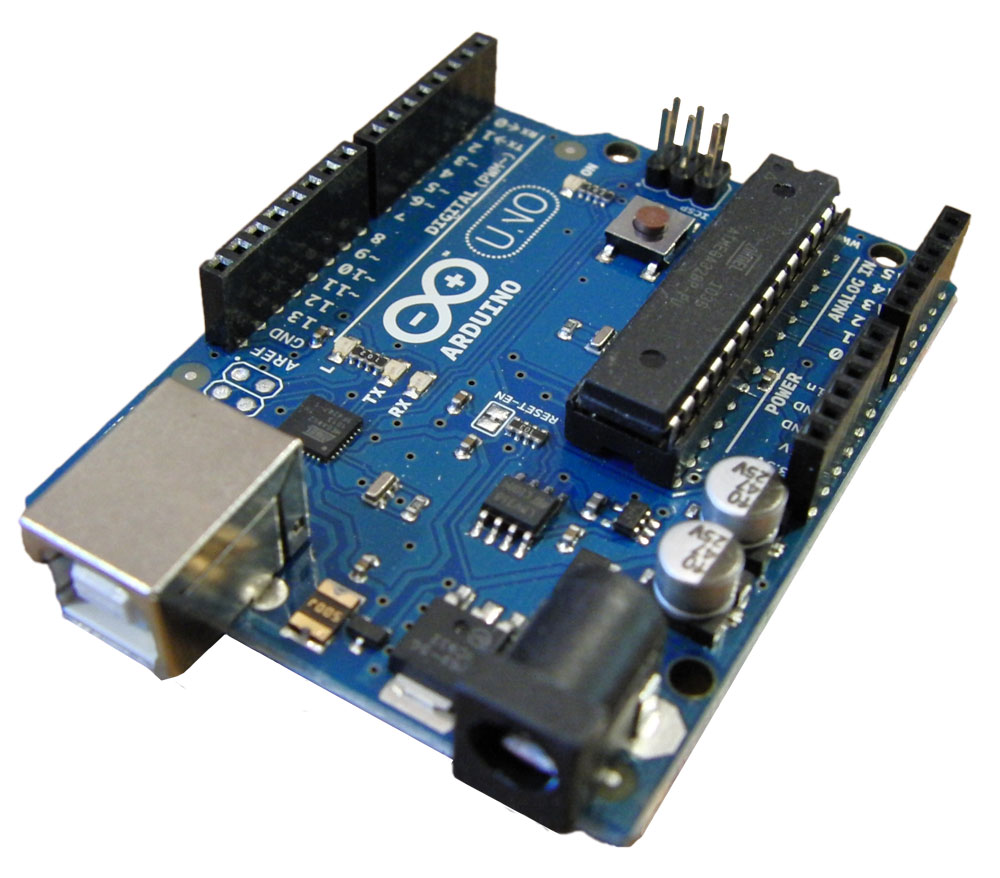
You may have had some initial experience with Parallax's Boe-bot and/or Arduino microcontrollers. Both are similar, and can be used for a lot of different types of projects. Another popular one is Raspberry Pi, which has a little more options to it. Depending on what you plan to do with the microprocessor will help you decide on the type of processor needed. Although some boards may look better, you want to look closely at the complexity, programming languages, price, ease of use, community support and its specifications. Arduino is know for it's ease of use and popularity for a wide range of tasks, and for this reason we have several already, for students to start on. Life hacker goes through three popular microcontroller boards as an example, to pick one for a specific project. Here are some links to board types to consider:
- Parallax Boards
- Boe-bot Kit
- Arduino Boards
- Red bot Kit
- Raspberry Pi
- Teensy Board
- Trinket
- Beagle Board
- Maple board
- Panda Board
- Cubie Board
- APC Rock
- Hackberry
- OLinuXino
- Gooseberry
 Ordering Parts
When building a new project, you will need to purchase certain materials. Some things to keep in mind when planing your material purchases:
- Purchase from local or places that have decent shipping charges
- Ordering from other countries can have hidden cost associated with customs and additional taxes
- Comparative price to see which supplier is going to sell it the cheapest
- Save on shipping, buy ordering from one supplier
- Ensure supplier does have part in stock, otherwise your order could be held back for days if not weeks at a time
Here is a list of local suppliers:
The last supplier is from Vancouver, so is actually considered an online supplier and may have some unique products and pricing.
Here are some online suppliers:
- Digi-Key Corp.
- Cal-Eng
- Newark element14
- Hobby King
- Adafruit
- Maker Shed
- Robot Shop Distribution
- Mouser
- Futurlec
Below is a sample table with sample products showing you what you should be including when you want to order something:
| Quantity | Part Name/# | Description & Web Link | Local Supplier | Unit price | Total Price |
| 1 | ARDDU-031366 | Arduino Uno Rev3 | Creatron | 27.95 | 27.95 |
| 1 | ARDPC-000077 | Arduino Proto Shield Rev3 | Creatron | 17.52 | 17.52 |
| 1 | ARFLD-000772 | LCD Shield Kit with 16x2 Character White on Blue Display | Creatron | 29.00 | 29.00 |
| 1 | &ARFMS-010002 | Motor/Stepper/Servo Shield for Arduino | Creatron | 32.75 | 32.75 |
| Total Cost | 107.22 |
 Create/Construct:
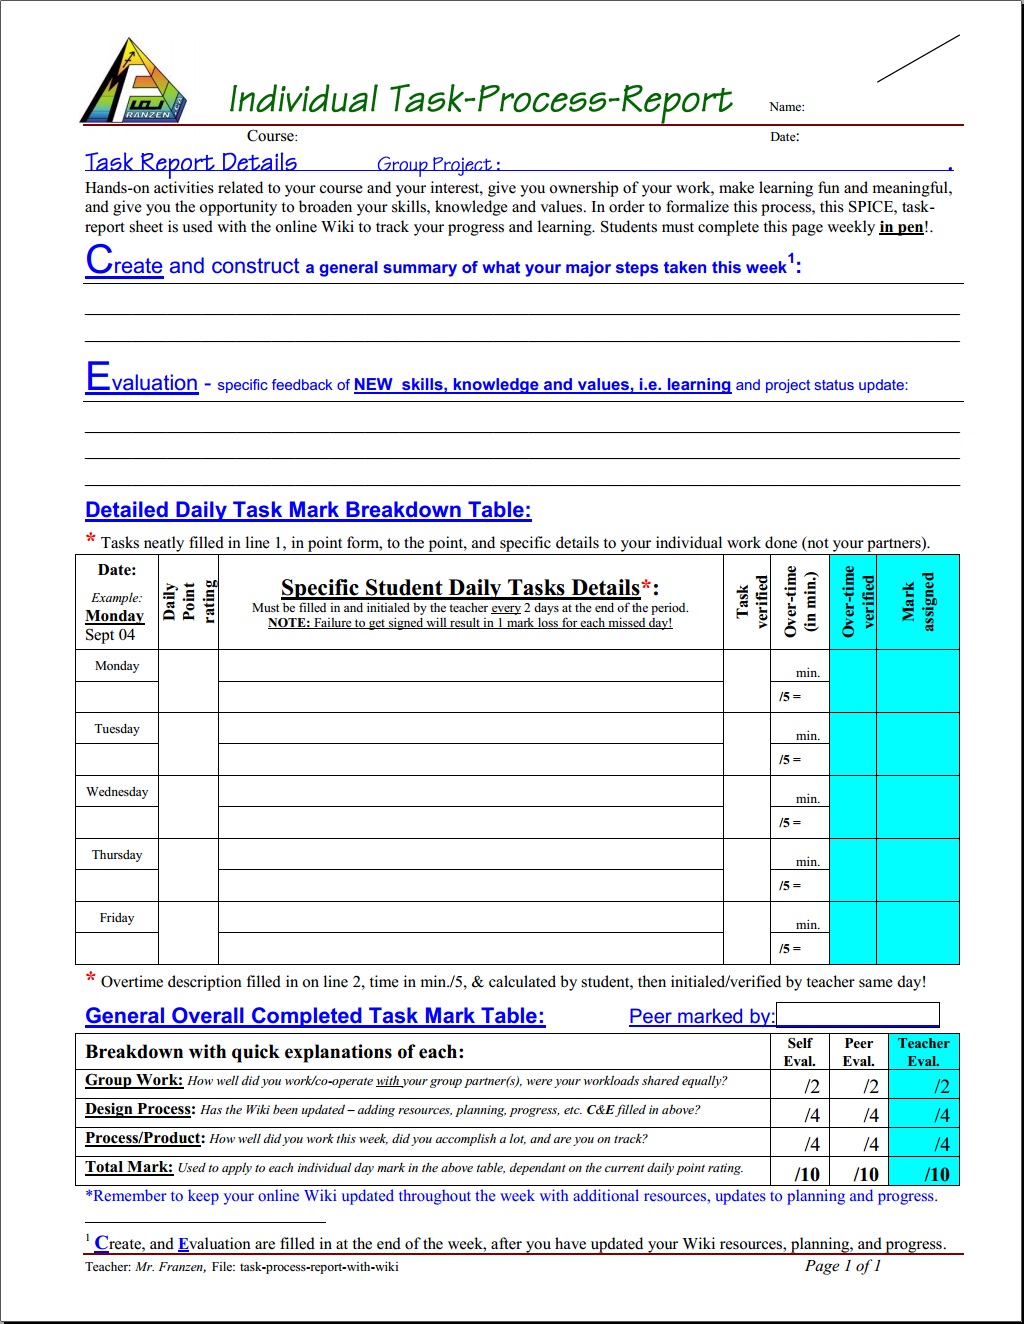
Daily, in the last 5 minutes of class with a pen (not pencil), fill in your SPICE Individual Task-Process Report ![]() with your name, project name, date at the top, and date in Daily Task Details table, point rating (ask teacher if you are not sure), give some thought as to what you accomplished on your project for the day and fill in the details for the day. Make sure you get this signed by your teacher, before leaving class. Below is a list of steps that you should follow to get started with your project.
with your name, project name, date at the top, and date in Daily Task Details table, point rating (ask teacher if you are not sure), give some thought as to what you accomplished on your project for the day and fill in the details for the day. Make sure you get this signed by your teacher, before leaving class. Below is a list of steps that you should follow to get started with your project.
Project Selection Considerations
- Where your experience, knowledge, and skill level are relative to the project components/goals
- Look at your time and realistically see if this is possible to do
- Make sure there is a lot of community support, so that you can get answers
Project Proposal Steps
- Review Wiki use page, to ensure you know how to add, edit, modify the Wiki
- Complete the Wiki Set-up assignment template along with your heading and page link
- Fill in your groups Wiki page project cover picture, group members, and project info and remember this is a "work-in-process"
- In the resource section, you are to fill in a bunch of support information, slide shows, videos, manufacture links, related forum links, possible materials, etc
- For your microcontroller in the resource section, show a comparison, between your top three picks with board specs, price, support, and ease of use filter sub topics
- Plan your major steps including identifying new learning tasks, research steps, material gathering, build steps, testing, etc. and list them in the planning section
- Research components you will need and fill in material table for items needed. List both materials you already have, and materials needed to purchase
- Print your Wiki project page into a PDF to submit your Group "Work-in-Process" Start Snapshot Workshop to show your current progress to be evaluated by class peers and teacher
- Each individual is to make a wiki project comment to a another group along with a support link(s) for practical, useful, and helpful support and copy this to a Word Doc to submit for evaluation by class peers and teacher
![]() Remember to make entries into your Wiki page at least one or two times a week, as you progress with your hands-on project. This is ideal to do as homework so you can maximize time in class with your project hands-on work. At the end of the week, those entries will also count towards your Task-Process Report mark due at the end of each week. It is preferred to research and complete as much theory work at home for homework, and use class time to work on your hands-on skills with your project.
Remember to make entries into your Wiki page at least one or two times a week, as you progress with your hands-on project. This is ideal to do as homework so you can maximize time in class with your project hands-on work. At the end of the week, those entries will also count towards your Task-Process Report mark due at the end of each week. It is preferred to research and complete as much theory work at home for homework, and use class time to work on your hands-on skills with your project.
Evaluation:
Effort completing each of these tasks is also cumulative, meaning it is going to help you all in the long run because of the organization and support these tasks offer.
| Evaluation Breakdown | Marks |
|---|---|
| Always double check that you have completed all components for full marks. | |
| Wiki Set-up - Main page heading and page link, copied HTML template project Wiki page | 10 |
| Group "Work-in-Process" Start Snapshot Workshop - Project Wiki page completed | 20 |
| Group "Work-in-Process" Start Snapshot Workshop - Class peer and teacher | 10 |
| Peer Project Support Comment - Project Wiki comment and link support | 10 |
| Peer Project Support Comment - Class peer and teacher | 10 |
| Task-Process-Report - Filled out - daily and weekly summary sections | 10/d |
| What Did you Learn - Test your knowledge here: | |
| Moodle Quiz - Based on above work covered, log-in here, help with quiz access/process | 10 |
| Total Marks | 60+ |
 Unit 2, Act. 2: Programming and Project Build
 Situation:
Now that students have gone through the process of coming up with a robotic related project, researched related information, documenting their work in process, and decided on a final build idea, students are now in the next stage which includes the process of protoyping, testing, programing their microcontroller, and final hardware builds. As students will be working on different projects, the way the project is worked on will be looked at more closely, to support how work is done.
Problem/Challenge:
Students will continue to fill out Task-Process reports to show steps taken, project process, and learning daily with final hand-in each Friday. Each Friday, students will get a half-hour to finish and finalize that weeks report which also includes the project wiki page. This is not intended to be all filled out on the Friday, but throughout the week with a final run through on the Friday.
Microcontroller Board Exercises
For the three common microcontrollers we have- Parallax, Arduino and Raspberry Pi, you are responsible to (be able to) connect each with inputs and outputs using LED's , switches, servo's and Piezo speakers. With predetermined integrated program, work all three controllers. with common related process, terminology and basic programming code/commands. You will be responsible for equivalent code for previous controllers that you have already worked on, to hand in.
Custom Project Refinement
For your custom group project, although programming is a big part of this project, there are other project issues that you need to be concerned with as you build your the hardware components of your project. Specific things to be concerned with and apply to your project are:
- Prototyping
- Materials
- Standards
- Modular
- Simplify
- Allowances
- Joining & Fastening
- Programming
Programming for your custom project will be most likely be with one of the below microcontroller boards, and the coding is to follow common programming practices and standards.
- Parallax
- Arduino
- Raspberry Pi
Investigation/Ideas:
 Below is a breakdown of each of the areas to include in your project design. You will need to show that you have addressed these design/build characteristics in your project. Further below, you will also find programming resources that you can use as a guide to help you with your microcontroller.
Prototyping
This is allows you to see what your project idea is going to look like or how it works before taking an extensive amount of time, materials, and build process. There are companies that do this as a businesses and commonly have "rapid prototyping" as part of this process. It is critical to do, prior to a final build using appropriate CAD drawings, appropriate materials, and build process. By making a prototype before your final build will save you time, cost, and resources.
For your own project, try to see what could be prototyped before attempting to go straight to the final build. Showing some pictures of your prototyping in your wiki would go a long way in showing more process in your documentation to help others see your steps. Trying to build a final in one shot is not only a waist on time, but a waist of all of your resources.
Materials
You will need raw materials to support your hardware. Understanding material properties, advantages, ease of use, weight, strength, cost, etc will help with the selection process. There are two major areas that you can look up to get information on materials namely:
- Material Classifications
- Material Properties
- Physical Properties of Materials
- Choosing the right material
When you select materials for your project build, always look into which will work best for your project build. Take a look at your project and start thinking about the materials you would prefer to use for your final build. Remember for your prototype, to use other materials that will allow you to build and test easily. Knowing how to work with materials such as soldering, brazing, gluing, bending, cutting, etc are considerations you must look at.

Standards
We use standards to keep things simple, save money, organization, good practice, safety, reliability, quality, minimize waste, increased productivity, etc. When working with your project using standards is going make your project easier to work with and build. For example, size and spacing standards can be used to allow more parts to be adapted to your project frame.
- International Organization for Standardization
- Engineering standards
- What ISO standards do for you
- Technical Standard Organization
- Standards Council of Canada (SCC)
- International Electrotechnical Commission
Your project should use common standards found internationally. Take the time to use common standards in whatever your project is going to be. Everything, from using a standard power supply, to common sized fasteners will make your project build that much better..
Modularity
Whenever possible, design and building in modules can be advantages. Parts can be interchanged and replaced when needed easily and quickly giving you flexibility. There are many examples of using modular components whether it is parts that fit into your computer to you kitchen cabinets,at home to programming, and without it, things would be a lot more difficult to work with.
There are a lot of great examples of the advantage of designing and building with modules. See what parts, programing, and components you can turn modular on your project.
Simplify
 If your design seems complex, look to see if you can simplify, whether it is to streamline your design, materials, build,or process, taking the time to do this will save you a lot of trouble down the road. Simple speaks to everyone as more user-friendly, easier to use, cheaper to make, easier to build, and more accepting.
With your project development and process, take the time to simplify whereever you can to make things simply.... easy.
Allowances
Allowances are key to things fitting. Fitting meaning things such as parts fitting, allocating enough time for a project to be completed, and having extra material just in case. As obvious as this may seem, it is common to find yourself a little short, whether it is the part not fitting, something cut too small or big, or not having enough parts or time to finish a project. Too much allowance can also be a problem, and tolerance becomes another important aspect to consider. Try to keep this in mind with your projects.
Joining & Fastening
There are lots of options for joining and/or fastening. Some are more permanent then others. Using fasteners, it makes sense to keep the same sizing standard and minimize the number of different sizes in a project to keep it simple and easy to work with.
If you have a kit, you will most likely have everything you need, but custom projects, you will need to make decisions on what to joint/connect project components. Above are some links to refer to for more details on what might work best for you.
 General Programming
Programming is a key part of these projects, as we are working with microcontrollers which require programming in order to work. Depending on the type of microcontroller will determine the type of code that will be needed with it. Common to all programming involves a number of key areas that fall under best techniques and coding practices. This will help with reading the code, prevent mistakes, and keep similar standards expected in programming.
Parallax
 This is a great introduction to microcontrollers. If you have not worked with them, this board comes in a kit called the Boe-Bot and has a decent microcontroller board that is programmed with PBASIC. As this was used as an introduction to programming in the gra de 10 Computer Technology (CT-10) course, there are step-by-step instructions for you to familiarize yourself with this board, servos, and basic programming. Below along with other related links you will find the CT-10 activities to use.
- 1-CT-10-BoeBot Intro
- 2-CT-10-Servo Motors
- 3-CT-10-Boe-Bot Navigation
- Parallax Main Boe-Bot Page
- BASIC Stamp Editor Software
- Boe-Bot Student Guide Version 2.2
 Arduino
Arduino is one of the most common and easy to learn languages. Here are some resource links to help you with this hardware.
- Arduino Software
- Intro to the Arduino

- Wikipedia on Arduino
- Site Tutorials
- Site Language Reference
- ladyada Arduino Tutorial
- Flos Science Tutorials
- Arduino Forum
- AdaFruit Forum
- Most Common Boards
- Getting Started
- Xbee Project Blog
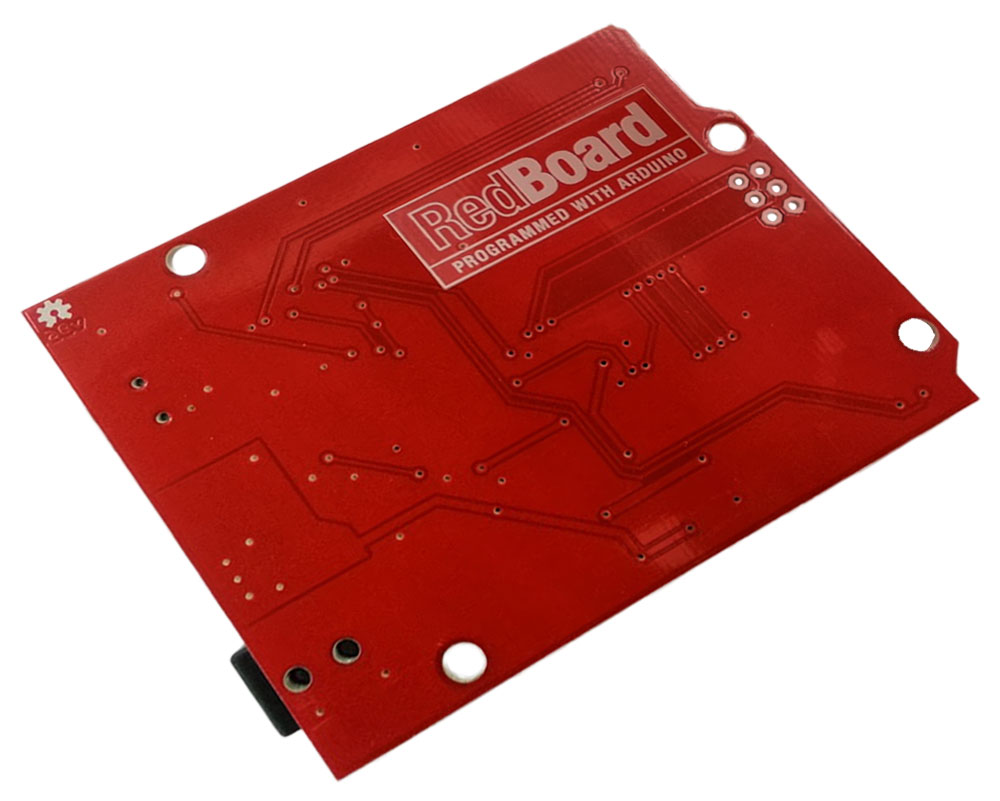
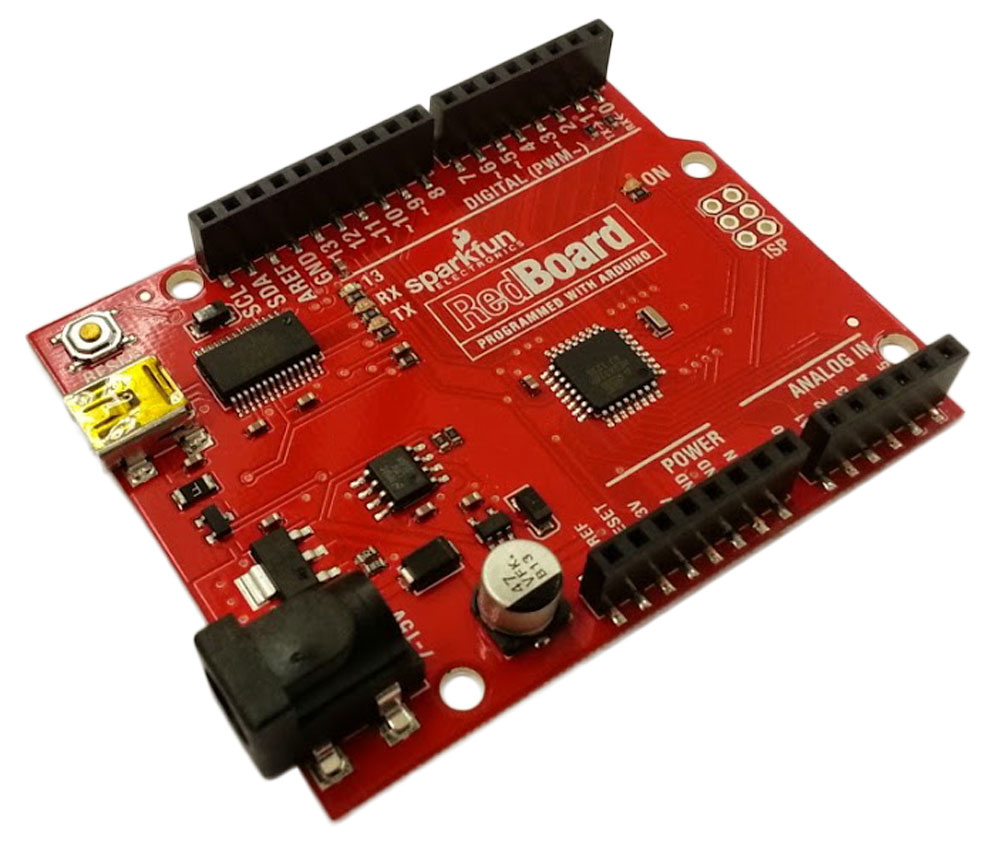
We have purchased several RedBoard - DEV-11575 microcontroller boards that are a mix of UNO's Optiboot boot loader with FTDI and R3 shield compatibility. As this is open source hardware/software the schematic ![]() is readily available for your to view along with free the IDE coder to program and upload your wiriing C or C++ code to your Arduino microcontroller. The back of this board is a lot smoother an less prone to scratching and shorting out because of the electronic surface mount design (SMD) instead of pin through hole (PTH). This method is cheaper, but if you want to replace microcontroller chip, you can't. Short of the above, the two boards have the same microcontroller and can be programmed the same way. Here is a link that talks about the differences, advantages of the Arudino and Rasperry Pi.
is readily available for your to view along with free the IDE coder to program and upload your wiriing C or C++ code to your Arduino microcontroller. The back of this board is a lot smoother an less prone to scratching and shorting out because of the electronic surface mount design (SMD) instead of pin through hole (PTH). This method is cheaper, but if you want to replace microcontroller chip, you can't. Short of the above, the two boards have the same microcontroller and can be programmed the same way. Here is a link that talks about the differences, advantages of the Arudino and Rasperry Pi.
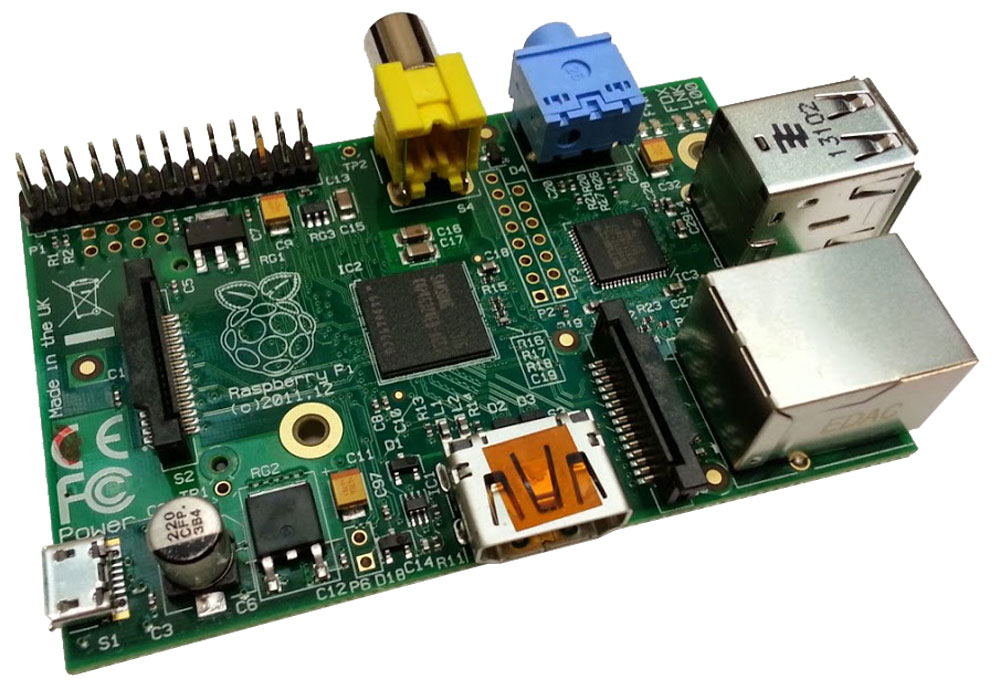
Raspberry Pi
Raspberry Pi is a powerful little computer that fits in the palm of your hand. Powerful enough to offer basic office computing, low-level gaming, Internet and e-mail access, media playback and many other features.
- Raspberry Pi
- Intro to RPi 1
- Intro to RPi 2
- Exploring Raspberry Pi
- From Box to App
- Using the GPIO Port
- Using Python
- Unofficial Tutorial
- Adafruit Tutorials
- Life hacker
- PiCon
- Quick Start Tutorials
- Raspberry Pi Tutorials
- Adafruit's Raspberry Pi Tutorials
- GPIO Setup
- GPIO Tutorials
- Python (programming language)
- GertDuino
General Resources
Here are some general resources that may help overall, with your project.
- The Engineering Tool Box
- Engendering
- 100 Top Resources
- Basic Electronics - Resistors
- Nano Quadcopter Kit
Ubiquitous Computing.
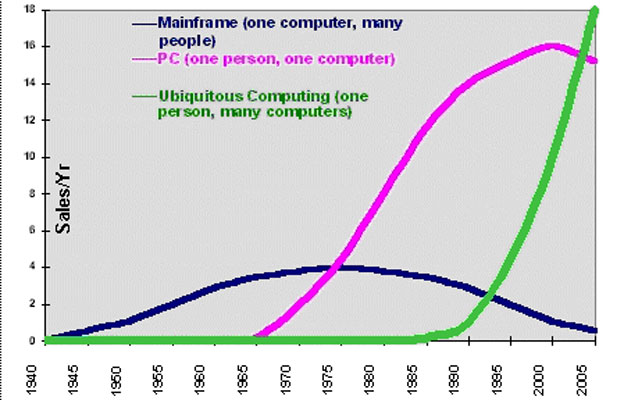
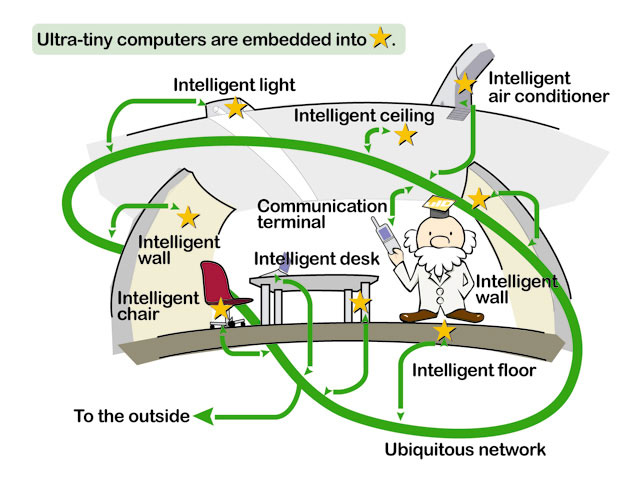
Ubiquitous computing is a more common term in the computing industry that relates to computers all around us and described as the next wave of computers. Below show further information that relates to this area..
- Ubiquitous Computing
- What is Ubiquitous Computing?
- Ubiquitous Computing Future
- Technology Of The Future
Create/Construct:
The steps here are broken down into two sections. Microcontroller Board Exercises and your Custom Projects. Depending on which board you are using with your custom project, you are responsible for the other two, in understanding, hardware, connections, coding, related terminology, and process.
Project Refinement Design
Create a word doc with a project name, description that list the areas below with 2-3 points describing how your project considers, applies these concepts into it's design. Use the above support information and links to support your points.
- Prototyping
- Materials
- Standards
- Modular
- Simplify
- Allowances
- Joining & Fastening
- Programming
You may want to download this Refinement Doc to use to get you started.
Parallax, Arduino, and Raspberry Pi Microcontroller Board Exercises

You are responsible to be able to connect input/output devices, write/upload appropriate code with common programming practices, and have an understanding of related terminology, tools, processes.
- You will have three controllers - Parallax, Arduino, and Raspberry Pi to work with in that order. If you have already worked with and familiar with Parallax, then move on to the Arduino, and so on. You will be tested on the basics of these boards and their related programming
- For the first controller (Parallax & Arduino very similar), you will start with a single output LED blink, then add a micro switch input to control the LED using both the hardware on a breadboard and related programming
- Integrate more input/output devices such as a mini rheostat and Piezo to interact with each other showing all devices interacting with each other.
- Consider different programming code such as instead of a blink, use a timed loop to create a LED fade effect, or adjusting Piezo sound
- Sketches of code can be copied, but keep in mind proper coding practices and standards
- When you have your integrated microcontroller board prototype/programming exercise working, show/demonstrate it to your instructor for marks.
- For the Raspberry Pi, Adafruit's Tutorials is a great way to learn about it and what you can do with it. Using the GPIO pins to branch out to external configurations and options such as a simple buttons and LED control project similarly to the last two boards and will give you a chance to work with Python programming language.
- For the other one or two controllers you have already worked with in the past, as a review, write the equilevent code in the respective language (PBASIC, Wiring, or Python) to do the same input/output control tasks with the same hardware components.
 An integrated program could be something, for example, that uses a push button to initiate the LED to blink for 10 seconds with a fade, then start the servo for 5 seconds forward at half speed, then backwards for 5 seconds at full speed, and then finishing off with three beeps from the Piezo speaker. For some this will be a review, where as others, this will e a first time attempt.
If it is your first attempt, you are highly encouraged to work with someone who has already had experience with that controller board. If your custom project includes one of these microcontrollers (most likely yes) then your custom project will count towards that controller exercise. If you have already worked with all of the boards you should continue with your project below, but be available to assist others..
Custom Project (Task-Process Report)
The following is a list of steps to be taking to ensure your project gets underway properly. In the last activity, your custom project was selected, and you were given a means to report on your progress using the task process report page and a wiki to continue updates daily, and weekly.
- After decided project, planning, and goals have been completed, it is time to order your specific hardware. Talk to your instructor first to confirm possible parts that are already in the class, then e-mail the cost list from your project Wiki page with items that need to be ordered to your instructor.
- While waiting for parts, initial programming, more research, and project refinement can be done at this stage.
- Using the above project related key components in the investigation section, you are to submit a Project Refinement Design showing specific details on each copied from your wiki as a more formal description of your project with these added details, as to how you will implement or already have these key components add into your project
- Once you have submitted these improved key component designs, continue with your program testing, and start on your hardware prototype. Final build is later, as your priority is to get a working project model up and running, so you can further test, modify, and improve your project system.
- When all the bugs have been worked out, programming and hardware wise, then start on finalizing the hardware build.
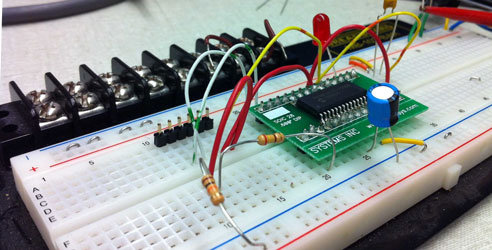
![]() When you get your microcontroller board- more so with PTH boards, it is a good idea to place some foam, or thick tape on the bottom of your board to prevent shorting out and/or scratching of desk/work area.
When you get your microcontroller board- more so with PTH boards, it is a good idea to place some foam, or thick tape on the bottom of your board to prevent shorting out and/or scratching of desk/work area.
Evaluation:
Keep your Wiki up-to-date as you go, with any practical new resources and weekly current progress, along with filling out your weekly Task-Process report page.

| Evaluation Breakdown Component Descriptions For Presentation | Marks |
|---|---|
| Always double check that you have completed all components for full marks. | |
| Microcontroller Boards Exercises - hardware, coding (3), terminology, and process | 40 |
| Project Refinement Design- improved key component design improvements | 20 |
| Task-Process Report - Filled out - daily and weekly summary sections | 10/d |
| What Did you Learn - Test your knowledge here: | |
| Moodle Quiz - Based on above work covered, log-in here, help with quiz access/process | 30 |
| Total Marks | 100+ |