Unit 3: ShowCase
This unit will give you the opportunity to present your work completed in this course. Here you will have the opportunity to show what you have learned, present your creative digital work, create new pieces incorporating principals and elements of design. Activity 1 and 2 will go towards your sumative evaluation mark.
Unit Content Activity Quick Links, Click to Jump to Specific Activity!
- Unit 3, Act. 1: Web Header-Footer
- Unit 3, Act. 2: Web Portfolio Presentation
- Unit 3, Act. 3: Wear Your Best with Western Tech
 Unit 3, Act. 1: Web Header-Footer
Situation:
Now it is time to showcase your work in this course. Several creative pieces have been created in this course and you are now ready to show off your talents through a web portfolio. Using a web portfolio will need an interesting, unique design piece to brand your web site portfolio with your work.
Problem/Challenge:
All web sites have a header and footer to frame in the site. You are to create a header with a co-ordinated footer that will be used in a "local" web site for your portfolio. The header is to include several elements which are as follows:
- Your face with three improved face elements, sized the full height of header
- Your name in prominent unique letters, ex: "Joe's Portfolio"
- Your improved illustrated logo and catch-phrase created in class
- Technical picture related to a technical subject here at Western
- Custom image representing a interest you enjoy
- Background made from scratch using several elements such as filters, adjustments, brushes, effects, etc.
- Five graphic button links with two different views: normal state and pressed state, to include Home, Profile (About), Projects (Work), Gallery, and Links
- Made to fit a 1024 screen with a height of 200 pixels (1000 * 200 pixels)
- Footer to match header design and include links to the same header links 50 to 100 pixels high
You will need to combine these elements together, such that your final design web header creates the context of a artistic and creative student professional portfolio which will show your talent and skills in Photoshop and Illustrator. Keep in mind the principles and elements of design while putting this web header together. This header is to later be used as part of your web portfolio, in the next activity.
Investigation/Ideas:
You will need to come up with some ideas on how your web page header will look, so sketching some possibilities of where graphic components will go, there size, image blending, effects, and what they will look like will help you form some initial ideas. Using the web to look up some general designs, but remember this is a unique header with specific components which you need to include in yours. Here are some links to some sample web headers:
- Dream Level Headers
- Free Web Headers
- Etsy
- Dev Ims
- Pappa Shop
- Free WordPress Headers
- Go Web World
- Symis Int'l
Backgrounds from scratch need to compliment your header. Creating and combining special effects, images, elements, text, etc. can be difficult to do by yourself, but by seeing how someone else has done it, applying the same process to your idea/layout, you can create your final design easily. Here are some links to Photoshop related tutorials showing process on how to do a lot of neat design pieces::
Here are some web tutorials you may use to get special effects, looks, or designs:
- 3d portfolio layout
- Clean Style Portfolio
- Website Background Guide
- Elegant Portfolio Web Design
- Hi-tech Collage PDF Version
These tools/tutorials may help with specific parts of your page such as your buttons, text, patterns, etc.
- Text Effects I, II, III
- Color Tools
- Photo Effects I, II
- Button tutorials
- Background patterns
- Design studio
- Unique Colorful Site
- Ultimate Photoshop tutorial list
To clarify about the above link resources, you are not trying to create completely new techniques here, you are using the above resources for their process, techniques, and steps that you are already familiar with, to finalize your web design portfolio header. Some of the above resources may be for advanced users, which will beyond your level of expertise and skill, so use what will be helpful for this project.
Create/Construct:
Time will be one resource you will not have to waist, so ensure that you stick to the deadlines.
Sketches
Take some time to review what needs to go into the header, i.e. what are all the elements needed to be in there. Take some time and review some of links and resources above to come up with more ideas and then sketch out a three different final possible layouts. Include colours, locations of elements, size, explanation notes, background, textures, etc.
Header
Creating the header will include several steps and it can easily de-rail your completion in the allocated time period. Plan to breakdown the major steps/tasks to complete and use that to guide you on amount of time per major task. This will ensure you finish on time to continue on next activity. Ensure you have organized a folder for this project to put all your related files in. Here are some steps to get you started:
- Setup using a web preset with a size of 1000 by 200 pixels
- Use guide lines, rulers and the grid to layout out your web header
- Create your background from scratch first, there are lots of ideas in the above resources
- Assemble, collect all your images required and put the originals into the same folder you just made, and then start placing them in their own layers in the final PSD output file.
- Your face should have three improvements clearly done to improve your look. This is your chance to create the glamour look
- The technical picture must be related to a technical subject here at Western Tech
- Your custom interest picture must relate to your portfolio
- Logo must be revamped to improve it's look, think of it as a second generation. Use Illustrator to accomplish this prior to bringing it into Photoshop
- Create a special text format to prominently show off your name
- Button links will need to be made with two states, namely normal and pressed state. Use layers to make both in the same location and when handing in, hand in with buttons in normal state, with pressed state hidden.
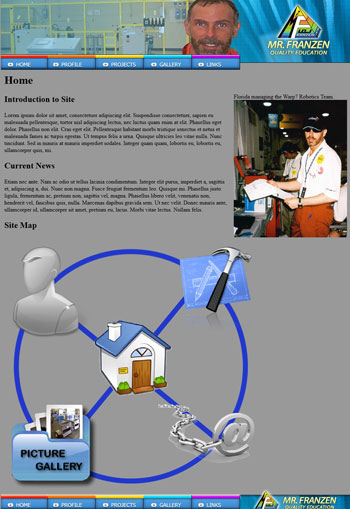
One important thing to keep in mind when making your header and footer is to think ahead as to what colour your background will be for the body of your web page body. You need to keep this in mind while you are creating your design. You may also want to consider a soft transition to the body background colour. Remember to name and organize your layer folders and sub layers. For the sample below, can you figure out what is missing in the web header below?

Footer
Footer must compliment the header, and as it is 50 to 100 pixels in height you will need to keep the design consistent. This will be left open on how you design this, but you must have links in the footer also going to each of the five pages as in the header. You may use the same graphic link buttons as in the header if you wish, or just use text links.
![]()
Evaluation:
Use this section as a check list to make sure that all the major components of this activity have been completed
| Evaluation Breakdown Component Descriptions | Marks |
|---|---|
| Always double check that you have completed all components for full marks. | |
| Sketches - 3 final sketched ideas on a single page | 10 |
| Header and Footer | |
| Background - made from scratch, colours, look | 10 |
| Face - three improvements, face cutout, colours, | 10 |
| Logo - improved version of origingal | 10 |
| Text Name - prominent text with your name | 10 |
| Technical picture - school subject related, size, location | 10 |
| Custom Interest picture - related to portfolio, size location | 10 |
| Button Links - five button with normal and pressed state | 10 |
| Design Principles Overall - Is the header put together well | 10 |
| Footer - compliment/match the header including 5 links | 10 |
| Evaluation Mark Total | 100 |
Unit 3, Act. 2: Web Portfolio Presentation
Situation:
After completing all of your work during the semester, it is important to be able to showcase and present your work. This can be done in several ways, but by far the best way is by using a web portfolio. It is portable, easy to show, and easy to create using an Authorware program called Dreamweaver. It has a similar layout to the rest of the Adobe and Microsoft software packages, making it easy to understand and use, similar to Microsoft's Power Point presentation software in terms of ease of use.
Problem/Challenge:
Your task is to use your header and footer graphics to create a single web page, and then duplicate the web page 5 times to create multiple pages. By modifying the names of each page, then updating the link addressing, each page will link to each other, creating a web site portfolio shell. Next is to add text information and graphics, to fill your portfolio.
Include the following in each of the pages:
- Home
- Introduction paragraph to the site portfolio
- Picture of yourself (medium sized - different)
- Current news about you
- A graphic site map made in Illustrator (dynamic links)
- Profile (About)
- Picture of yourself (medium sized - different)
- Past, present, and future schools
- Past, present, and future work experience/direction
- Character strengths
- Interests
- Projects (Work)
- This is where you display your work completed in this course (minimum of 6)
- Thumbnails linked to full screen images
- Include a caption with a quick explanation introduction
- Show work done with previous course
- Gallery
- Pictures of some of your favorite artistic work (public domain) can be placed here
- Show 4 pieces of work from Illustrator including the author
- Show 4 pieces of work done in Photoshop
- Up to 10 other relevant pieces of work you want to share (optional)
- Use thumbnails that lead to full screened images
- Links (Resources)
- Insert a links related picture (medium)
- 3 tutorial index sites
- 3 related online tools
- 3 related career links
You will present your work to the rest of the class after the project work time is due.
Investigation/Ideas:
Getting familiar with Dreamweaver
Here are some support links that you may resource to for extra help with your web portfolio site/page
- Create Your Website in Dreamweaver
- Building a Web Page with Photoshop and Dreamweaver CS4 video
- Dreamweaver and Photoshop Integration video
- PNG 8, 24, 32 what?
- Tutorial Steps to Creating a Site in Dreamweaver CS4
- Basic Adobe Dreamweaver CS4 Tutorials
- W3Schools HTML Tutorials
- HTML Basics Tutorial
- Simple website photo gallery
- What Makes a Great Presentation
- How To Give a Great Presentation: Just Do It!
- 3 Reasons To Start With A Visual Site Map
Create/Construct:
Although there are lots of instructional steps below, the process is very simple. Every step has been detailed in case you have difficulty with part of the process. There are 4 major steps:
- Export your graphics out of Photoshop to a web page to edit in Dreamweaver
- Using Dreamweaver to finish one web page, then duplicate and customize each page
- Create rollover button links for each of the custom web pages
- Insert your information and graphics - your project images and some favorite ones you like
Step 1: Photoshop to Dreamweaver for your Header
You will need to chop up your header into sections or slices that separate the buttons
- Open your header in Photoshop
- If you have not already done this, create guides on the insides of all the buttons
- Enlarge your canvas 100 pixels below, create two layers and make to 50 pixel boxes with different colours for space holders (forcing table code to be added for use with body content and footer to slip in later).
- Activate snap to guidelines by going to View > Snap to > Guide lines
- Under the Crop Tool icon, select the Slice Tool
- Slice header up such that the buttons are separated from the header in as few slices as possible, use the Slice Select to delete boxed slices not wanted, include space holders also
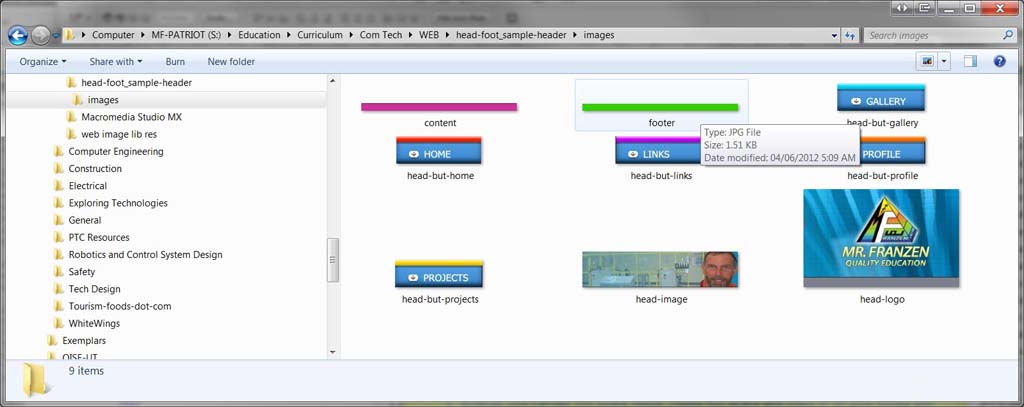
- Use the Slice Select, double click on sliced section to rename to appropriate single word names for each of the slices such as header, but-home-n, but-profile-n (n for normal)
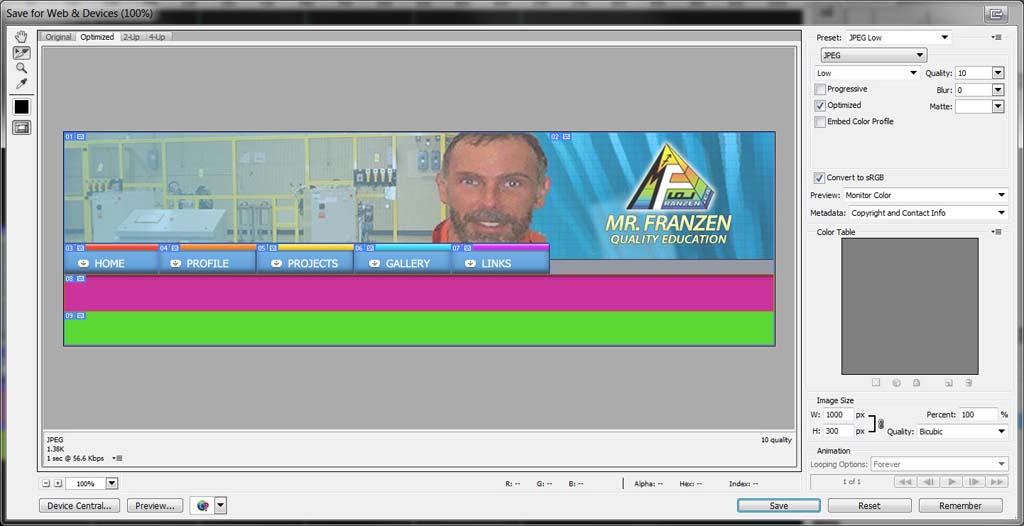
- Select save for web, and in the new box, ensure appropriate optimized image file formats for each of the slices is what you want, and create a simple web page name such as Clicking the save will open a "Save Optimized As" box...
- Select location where the generated web page and "image" folder (which holds the images) will be
- File Name should be something simple like "mf-home" mf being your initials, home for your first home page
- Format should be HTML and images, so that it creates a web page and images in one shot
- Settings should be on default, modifications could be done here for special outputs, but not necessary
- Slices, select All Slices to have all images sliced exported out to your web home page
- Now back to your full header image, change the layer, or effect of button look from normal-state look to pressed/hover-state look on all of your buttons, then modify button names- add an -h on the end for hover
- Select save for web again in an appropriate optimized image file formats, in the same location as before, except just save selected images that were modified, no HTML, and this will save just the new hover/pressed button-look images needed for later
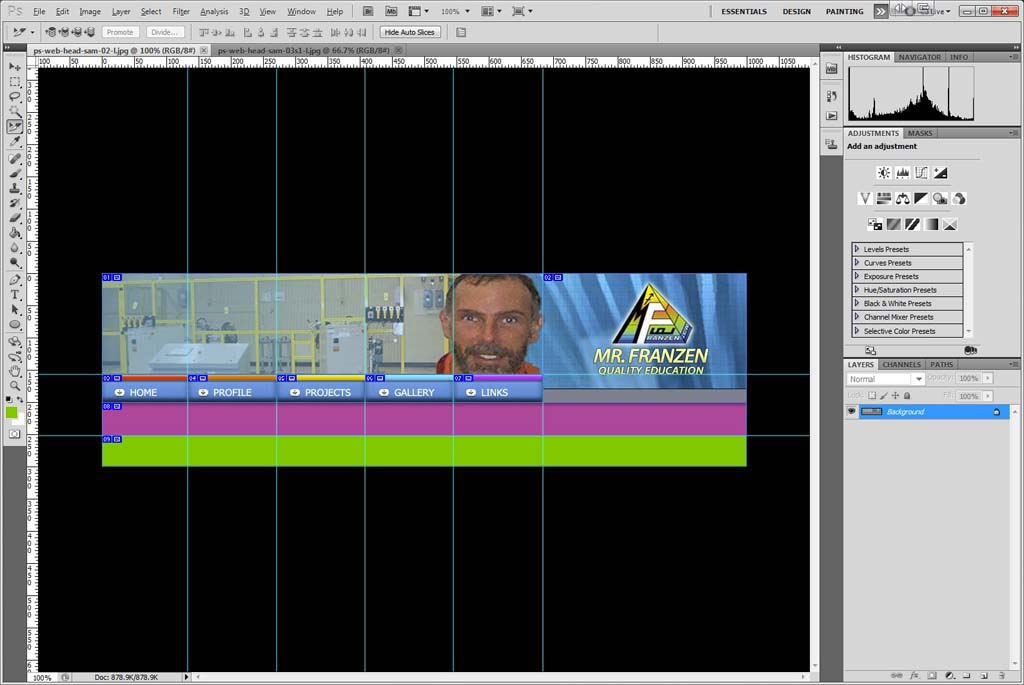
Steps 1-7
Slices
Step 8
Optimize

Steps 8
Saving
Step 8
Output
Step 2: Dreamweaver - Completing Your Web Page Site Shell
After your header is done you will need to add the footer and content body in between.
- Follow the same steps above to bring in the footer, but make sure you save to a new folder, as to not over right previous images and HTML file. Later you will copy the code and images over to your original file folder
- Open Dreamweaver and setup a new Site Definition
- Go to File Panel and select Manage Sites, and select New Site. A new window named Site definition will open where you will create settings for your site
- In the first screen you need to give a name to your site. ex: mf-site, Click Next
- Select No, I do not want to use a server technology. Click Next
- In the third screen, Editing Files Part 3, select your website folder using the folder icon. Click Next. This is the folder that contains your site images
- In the next screen, "How do you connect to the remote server?" choose None from the drop-down menu. Click Next
- You will be able to view your site summary, then click Done. Before finishing click on Export and save your STE file set-up in your root directory where your HTML home page is, the click on Done
- Your files and folders should populate in the Local Files panel area, double click on your HTML file made by Photoshop to open, and on the top menu select Split view to show HTML code and web page
- Looking at the code you will notice some table related commands that were used to create your layout of all of your images in your header. You will need to open your footer HTML file, and copy the footer table code over to your header HTML file where your footer spacer image is
- Content body section is added by selecting the content image spacer, deleting it, then do one of the following:
- selecting Table in the Insert panel, and then fill in how you want the table to be created by the number of rows and columns
- or using the sample's source code, by viewing source code from a browser and copying just the content body section to yours
- Use Heading 1 to create a title called Home using the Insert panel text section to identify the page.
Check out to get you started. You will still need to do your own button rollover links as your header and footer will be different than the sample.
Step 3: Rollover Button links
- Have both your normal and hover-pressed images in the same image folder named appropriately
- In Dreamweaver open up your web page, and ensure your Photoshop generated HTML file is good
- Click on the Insert menu > Image Objects > Rollover Image
- In a new window:
- Type in a unique name for your image
- Click on the small folders to enter in the addressing to each of the button state views
- Add in Alt Text, which is what the mouse will show when hovering over the area
- Finally add the address by clicking on the small folder icon
- Do all five buttons on the header on the one page
- If the header buttons are exactly the same as the footer, you can just copy the rollover code from the header to use with the footer rather than having to go through the process, otherwise you will have to do the footer buttons using the rollover image window
- Note: Each rollover must have a unique image name identifier, otherwise they will not work on your page/site, therefore if you copy rolloves to other pages, ensure you change the rollover image name identifiers
- Save your page, Ctrl S, then select your header page in the Local Files panel, and Ctrl C, then Ctrl V, four more times, so you will have five web pages, one for each button address
- Again using the the sample above, you could copy "Content Body" section from the source code to insert into your Photoshop HTML generated code
Step 4: Adding your Content
Now that you have all five pages made and linked to each other, you can start adding in your content information and graphic images. For the gallery images you will need to make two sizes, a small image for the thumbnail about 300 by 300 pixels and then the full size image minimum of 1024 by 764. If you want a specific colour for your page and background, add it in the body open command right below the close head command, see sample souce code on Home page, line 29, bgcolor="#999999" gives a light grey.
Be prepared to present and clearly discuss in detail your site, projects, experiences, insight and learning throughout the course.
Evaluation:
This project will be evaluated on completion of your web site portfolio. Presentation, communication, and participation will be an important part of your marks here.
| Evaluation Breakdown Component Descriptions | Marks |
|---|---|
| Always double check that you have completed all components for full marks. | |
| Web Page Creation - page size, layout, buttons, content body | 5 |
| Navigation Links- rollover dynamic links working | 10 |
| Image Site Map - Illustrated graphical map image showing site | 10 |
| General Info and Graphics - complete, organized, links, gallery | 25 |
| Projects Shown - your work from this year show-cased | 30 |
| Overall look - consistent theme, organized, colours, principles of design | 10 |
| Presentation - communication, 5 minute time, knowledge, completion | 15 |
| Total Marks | 100 |
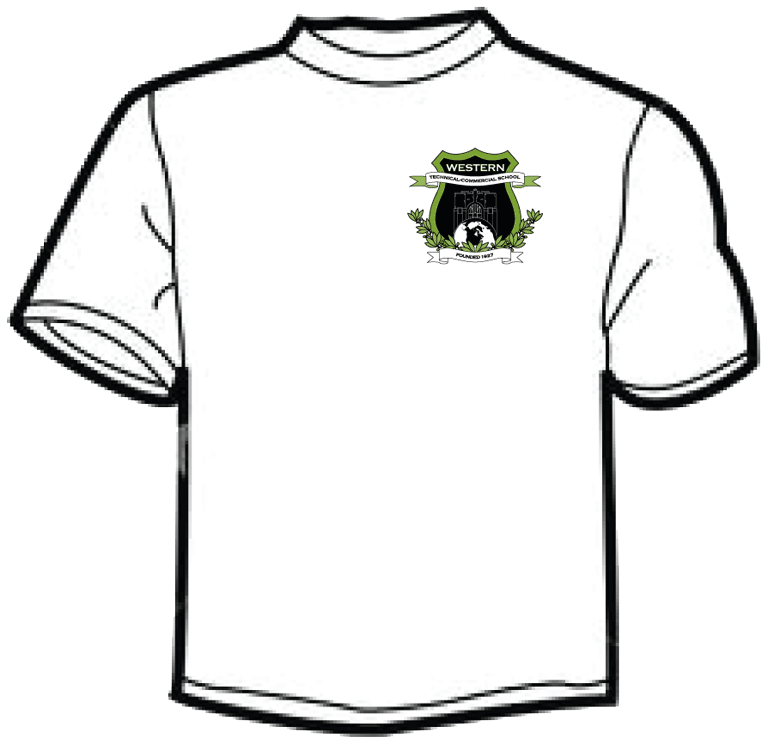
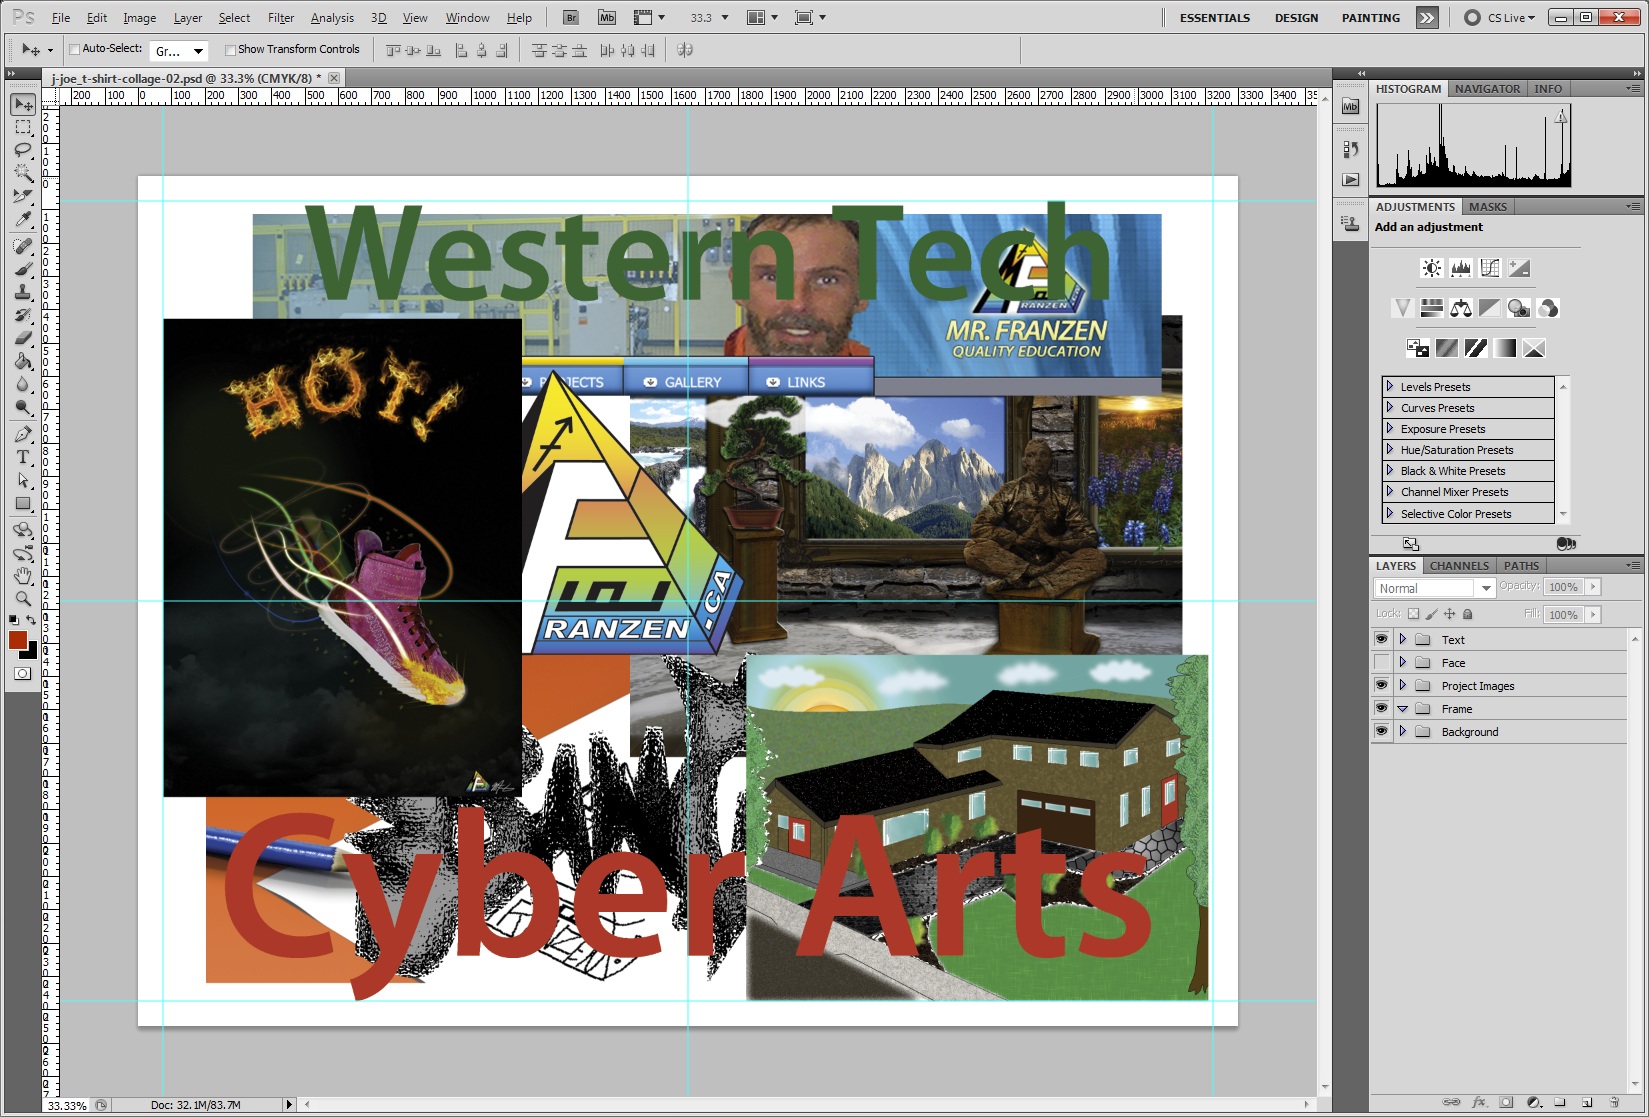
Unit 3, Act. 3: Wear Your Best Collage with Western Tech
Situation:
The course it almost finished and we have one last project to work on. This project will allow you to showcase all of your work in a fun, but skilled level of artistic design. We have recently obtained a T-shirt clam transfer iron, and have white cotton T-shirts with the school crest silk-screened on the front. We also have letter-sized heat transfer paper to transfer your design to the T-shirts.
Problem/Challenge:
Design and create a framed collage using all your completed work from this semester to fit on a landscape letter-sized paper with a custom background to take up about 10% of page. The theme of the collage is you and your work. Your project images must be creatively blended together with equal sizing to show the best parts of your project work. Green text variation "Western Tech" about 30-40 mm high, must be at the top in clear contrast along with 50-60 mm high text "Cyber Arts" across the bottom even more prevalent. Use a unique and special effects text type to show your talent on the "Cyber Arts" text. File must be 300 dpi for print quality production with limited or no white colour.
Investigation/Ideas:
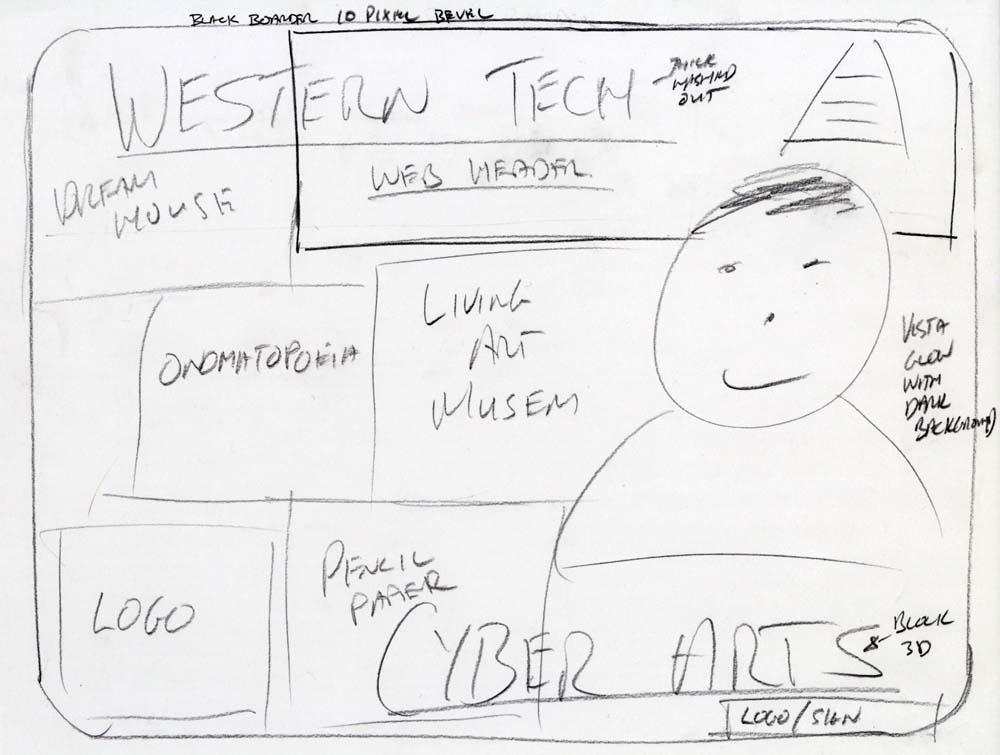
Review all of the projects completed in our semester including:
- Dream House
- Onomatopoeia
- Pencil-paper
- Logo
- Sneaker Ad
- Living Art Museum
- Web Header
Decide on how you can show these off to their best elements. Using Photoshop's tools properly can save you time and reap excellent results. Review all the tools we have used, some of which will come in handy, to do a great job in design, placement, overlays, combining, and blending of your images:
- Move Tool (V)
- Marquee Selection (M)
- Transform Selection
- Lasso Selection (L)
- Quick Selection
- Magic Wand (W)
- Crop Tool (C)
- Slice
- Eyedropper(I)
- Color Sampler
- Ruler
- Count
- Healing (J)
- Brush(B)
- Pencil
- Clone Stamp(S)
- History Brush(Y)
- Eraser(E)
- Gradient
- Paint Bucket(G)
- Blur, Sharpen
- Layers
- Blending
- Filters
- Grid
- Guides
- Adjustments
- Transformations
- Masks
- Image size
- Canvas sizing
- Type text (T)
- Pen
Take a look at some samples of collages and different ideas on how you can design your collage:
- Quick-and-Easy Collages
- Create a Collage
- Make a Collage

- Blending Multiple Images
- Framed Photo Collage
- Flickr Photoshop Collage Pool
- Creative Collage Gallery
- Photoshop Collage Gallery
- Memory Collage in Photoshop
- Blend Images with Feathering
- Create a Collage
- Create a Photo Collage Effect
- Combine Images Creatively
- 45 Collage Tutorials
Some tips and thoughts to keep in mind:
- As this will be a print production, ensure that your images are at 300 dpi including your final collage design
- Stay away from white in your images if possible, as white gaps (means no colour transfer) will leave a glue residue on your T-shirt
- Experiment with multiple layers and blending modes by using the shortcut by having Move tool selected, hold the shift button, then use the + or - tool to rotate through all of the blending modes available
- Focus on a three theme colours and a consistent theme look, and layout
- Remember that although you want to make things look a little different and better, don't go too far that you can not recognize the original images
- Create a 1/4" print margin around the outside edges, as printers can not print to the edge of the paper
- First T-shirt wash, wash in cold water only, note this printing process results in being less durable than silk screening - so take care of it
- Placing objects from Illustrator, Photoshop, and original high resoultion image files will be placed as a smart object by default. Smart objects retain maximum resolution during re-sizing, if you want to modify-edit image pixels, you will need to Rasterize the Smart Object in the Layer menu first
Create/Construct:
Follow these steps to create an awesome T-shirt collage design:
- Take a look at sample collages, ideas on how to make one, different possible layouts
- Keep in mind the Principles and Elements of Design
- Put some ideas down on a full page of blank paper by sketching layout, text, blending, boarder, and colours of your final design
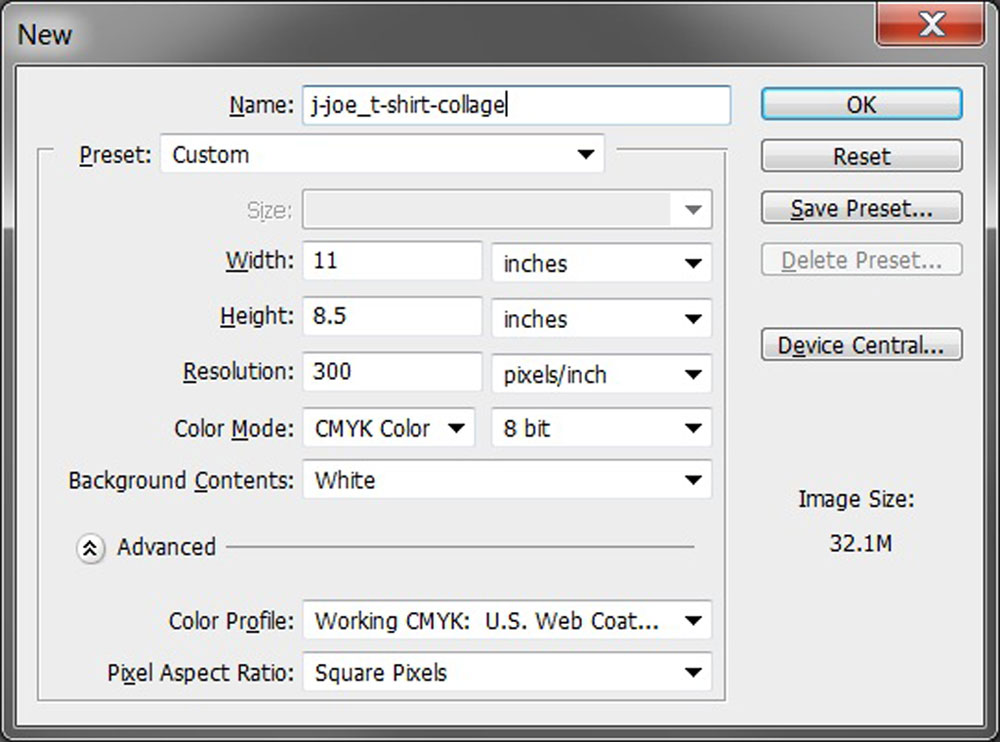
- Open up a new Photoshop file, and set-up for letter, landscape, 300 dpi, then turn rulers on and set to inches
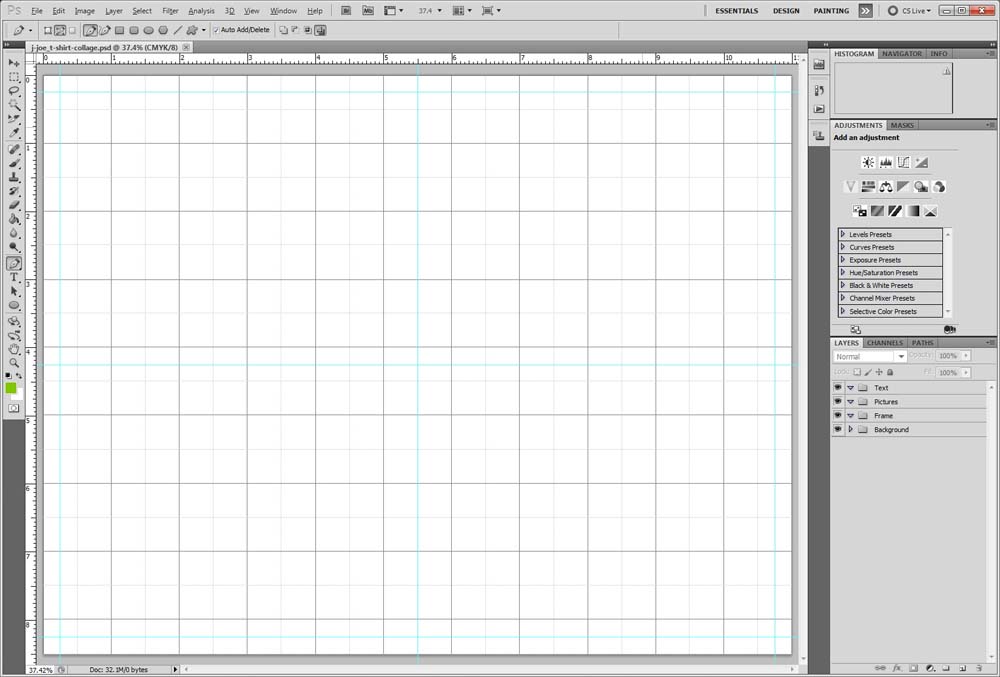
- Create 1/4" print margin guides, centre guides, set-up grid to inch with subdivisions every 2 (Turn on through menu - Edit >Preferences>Guides, Grids, & Slices, then go to View>Show>Grid)
- Organize some folders for your sub-layers with folder names: Text, Pictures, Frame, Background
- Use menu: File>Place to bring Photoshop PSD, Illustrator AI, and any other graphic files needed
- Create your required text Western Tech and Cyber Arts on to your layout in it's own folder and layers
- Create a custom unique background in it's own folder and layers
- Insert a boarder to frame collage in it's own folder and layers
- Reshape, re-size, rotate, overlap, and layout your images as needed
- Blend, soft erase, mask, etc images to seem there are no edges between images
- If necessary, use filters, effects to finish
- Check with instructor, then hand-in for printing to specialized transfer paper to transfer to T-shirt
Step 3
Sketch 1, Sketch 2
Step 4
Set-up
Steps 4-6
Ruler, Guides, & Grid
Steps 7-8
Objects "Placed"
Evaluation:
This project will be evaluated on completion of all steps, and requirements. Final image to be handed in PSD and JPG formats
| Evaluation Breakdown Component Descriptions | Marks |
|---|---|
| Always double check that you have completed all components for full marks. | |
| Sketched Ideas - 1 full page, 2 sketched possibilities | 10 |
| Project Images - all project images -creativity and sizing | 10 |
| Background - custom unique consistent with theme colours | 5 |
| Text - creative Western Tech, Cyber Arts, sizing, contrast, colours | 10 |
| Blending - images, background, effects, theme | 15 |
| Boarder - framed in with theme boarder | 5 |
| Overall design - Principles and elements of design, overall look | 20 |
| Total Mark | 75 |